You're previewing the student experience. You don't need to complete this lesson — your progress and XP aren't saved.
Scratch Jr
Beginner
30 mins
Teacher led
What you need:
iPad/Tablet

Move and Groove: The Dance Party Begins!

Guide your students through an exciting journey into coding with Scratch Jr. Introduce them to the basics of coding, teach them how to control character movements, and let them create their own dance routines. They'll explore changing backgrounds, creating sequences, and understanding the concept of cause and effect. A fun-filled lesson that combines learning and creativity.

Teacher Class Feed

Load previous activity

    1 - Introduction to Scratch Jr. Dance Party

    Welcome to our exciting lesson! Today, we're diving into the fun world of Scratch Jr. with a mission: we're going to code a massive dance party for Scratch the Cat!

    In this lesson, you'll learn the basics of coding by making your characters move, spin, and groove. You'll be the choreographer and the programmer! We'll explore:

    • Controlling Movements: Giving characters exact instructions on how to move.

    • Creating Sequences: Putting dance moves together in the right order.

    • Cause and Effect: Making things happen on the screen by sending commands (like when you press a button, Scratch starts dancing!).

    • Changing Backgrounds: Setting the perfect stage for our party.

    Get ready to move and groove with Scratch Jr.! Let's start coding our routines and throw the best digital dance party ever!

    2 - Welcome to Scratch Jr.

    Scratch Jr. is an engaging platform designed specifically for young learners to explore the basics of coding. It’s a hands-on tool that allows students to bring their creative ideas to life by designing their own stories, games, and animations.


    How Coding Works on Scratch Jr.

    In Scratch Jr., students learn to code using colorful blocks that snap together like puzzle pieces. This visual approach is intuitive and fun, making complex ideas accessible. Each block represents a different command, which allows students to control their characters’ movements, actions, and interactions on the screen.

    By snapping these blocks together, students naturally grasp fundamental coding concepts without needing to type any code. They learn about sequencing (the order of commands), loops (repeating actions), and events (cause and effect).


    Educational Benefits

    We use Scratch Jr. because it is perfectly tailored for this age group. It encourages and develops essential skills in both coding and broader educational contexts:

    • Creative Thinking and Problem-Solving

    • Logical Reasoning and Planning

    • Understanding Cause and Effect

    As students experiment with different blocks and sequences, they are setting a strong foundation for future learning. Scratch Jr. makes coding exciting, accessible, and an essential part of the curriculum.

    3 - Getting Started

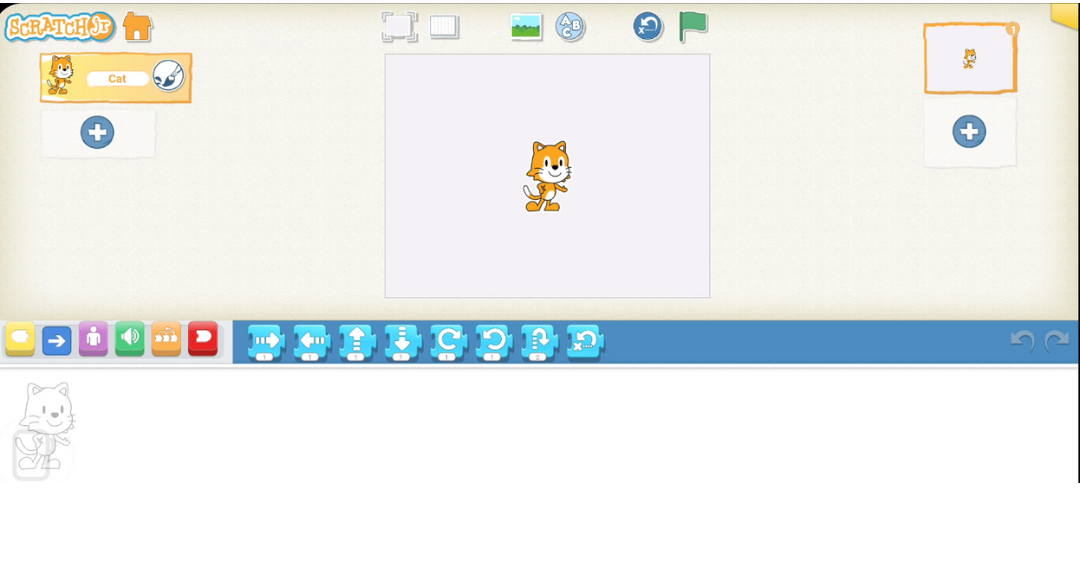
    To begin the coding session, guide your students to open a new project in Scratch Jr.

    1. Ask them to look for the Home button (the little house icon) in the top left corner of the screen. Tap it to get to the main menu.

    2. Once on the main menu, look for the large (+) symbol. Tell them to tap this to start a brand new, clean project.

    Circulate around the room to make sure everyone is successful. This is an important step to ensure every student has a fresh slate for their code. They should see the default Scratch Cat character standing on a blank white stage, ready for the dance party!

    4 - Green Flag means Go!

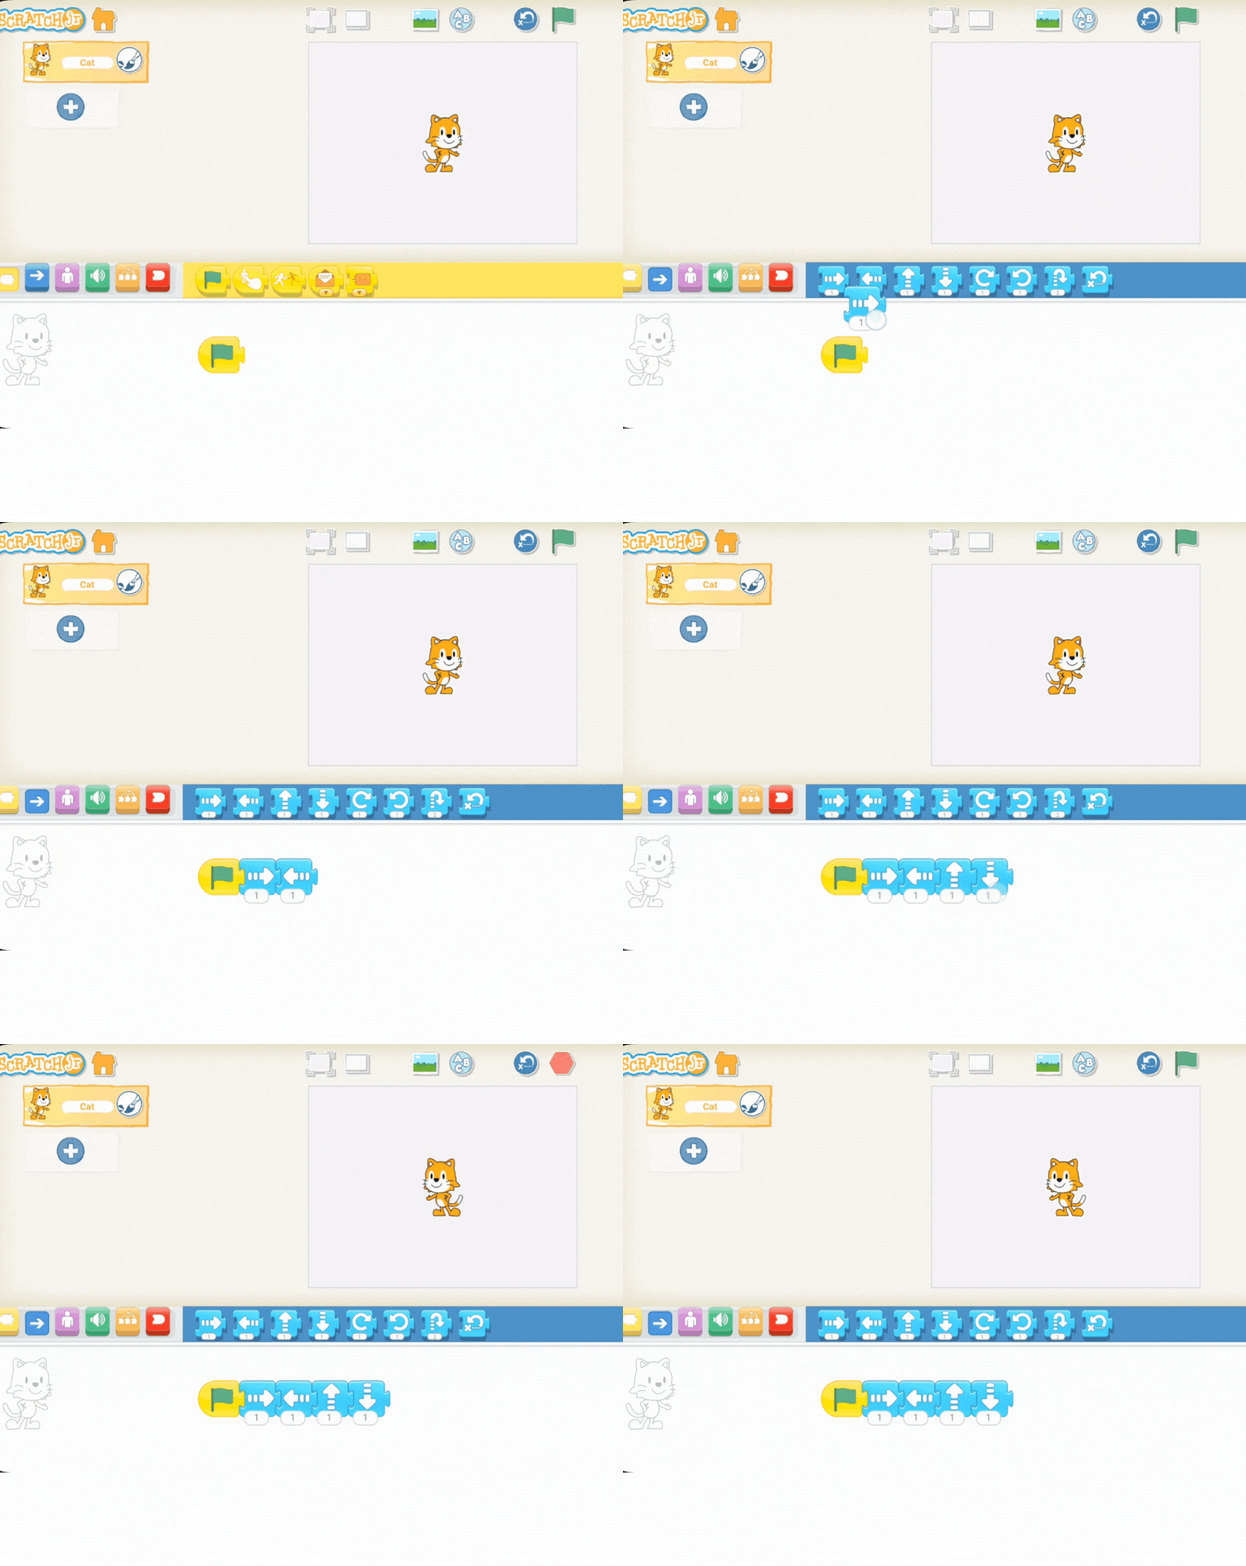
    Now that you have your new project open, explain to your students that every sequence of commands in Scratch Jr. needs a starting point. That starting point is the green flag block , which is found in the Events category (the yellow blocks).

    The green flag block is like pressing the "go" button; it tells the character exactly when to start following the instructions they've snapped together.


    Testing Your Code

    Once the students have connected a few instruction blocks to the green flag, they can test their code. Instruct them to click the green flag button located just above the stage on their screen.

    This action will trigger the sequence, and they'll see their character move according to the commands they've programmed. This simple process is essential for learning the basics of sequencing and understanding that code only runs when you tell it to!


    5 - Demonstration: Building a Sequence

    Now, it's time to introduce the basic movement blocks that will become the dance moves for Scratch the Cat!

    Explain to your students that the blue blocks, found in the Motion category, are their choreographer's tools. Each block represents a different action Scratch can perform—moving forward, backward, turning, jumping, and more.

    1. Start with the Flag: Remind the students that every dance sequence needs to start with the green flag block (the yellow start block). Drag and drop it into the coding area.

    2. Add the Moves: Demonstrate how to drag and drop different movement blocks and snap them together after the flag. You might show an example like: Move Forward (2 steps), followed by Turn Left (45 degrees), and then a Hop or Jump block.

    3. Combine and Create: Emphasise that they can combine these blocks in any order and change the numbers on the blocks to make the dance moves bigger or smaller. Encourage them to experiment and combine different blocks to create their own unique dance routine!


    6 - Setting the Scene: Changing the Background

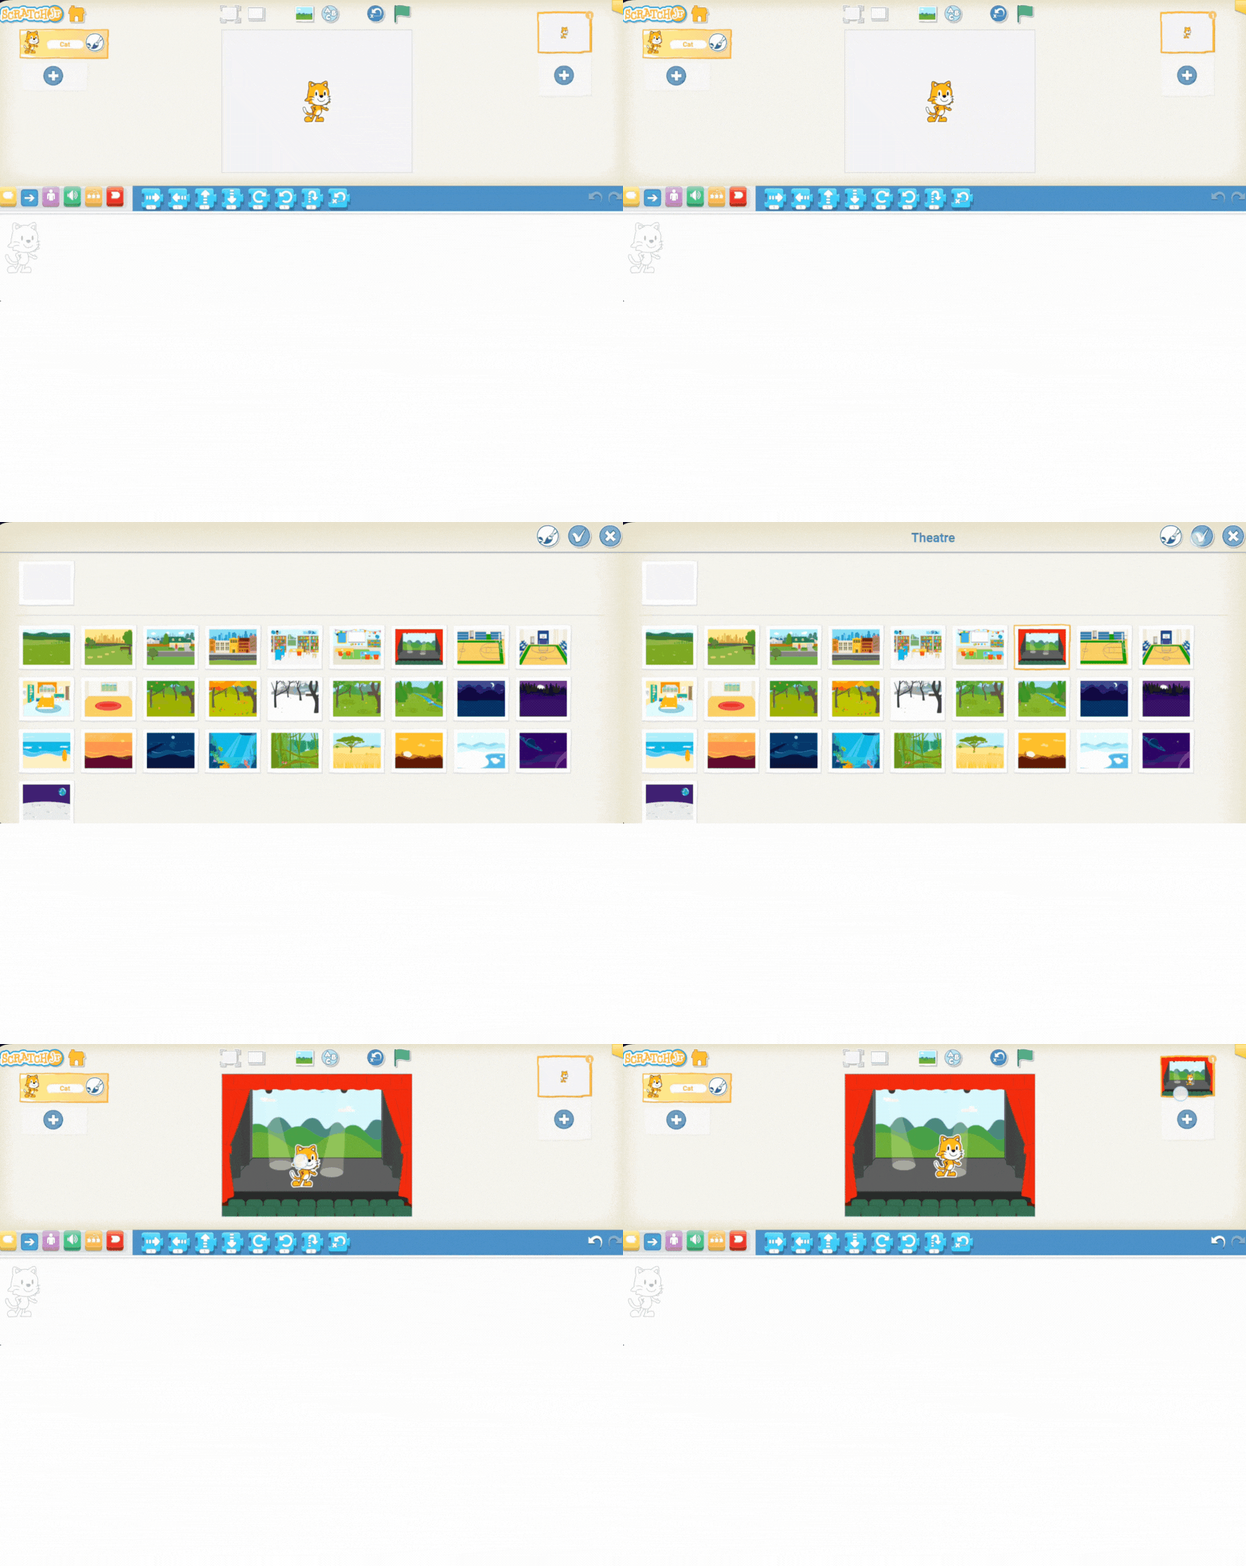
    Explain to your students that every great dance party needs a great location! Just like setting the scene in a story, they can choose different backgrounds to create the perfect setting for their characters.

    1. Find the Icon: Guide them to look for the background icon (a small picture/landscape) located in the top menu bar, next to the character area.

    2. Explore Options: Encourage them to click on the icon and briefly explore the various background options available.

    3. Select the Scene: After exploring, guide them to settle on the "Stage" background. This selection will set the scene for a big concert, giving their project a fun and lively atmosphere that is perfect for the dance party they are creating!


    7 - Coding the Cat's Dance Routine!

    Now that the stage is set, it’s time to write the program for the dance party! Explain to the students that they are now writing their first algorithm for Scratch the Cat.

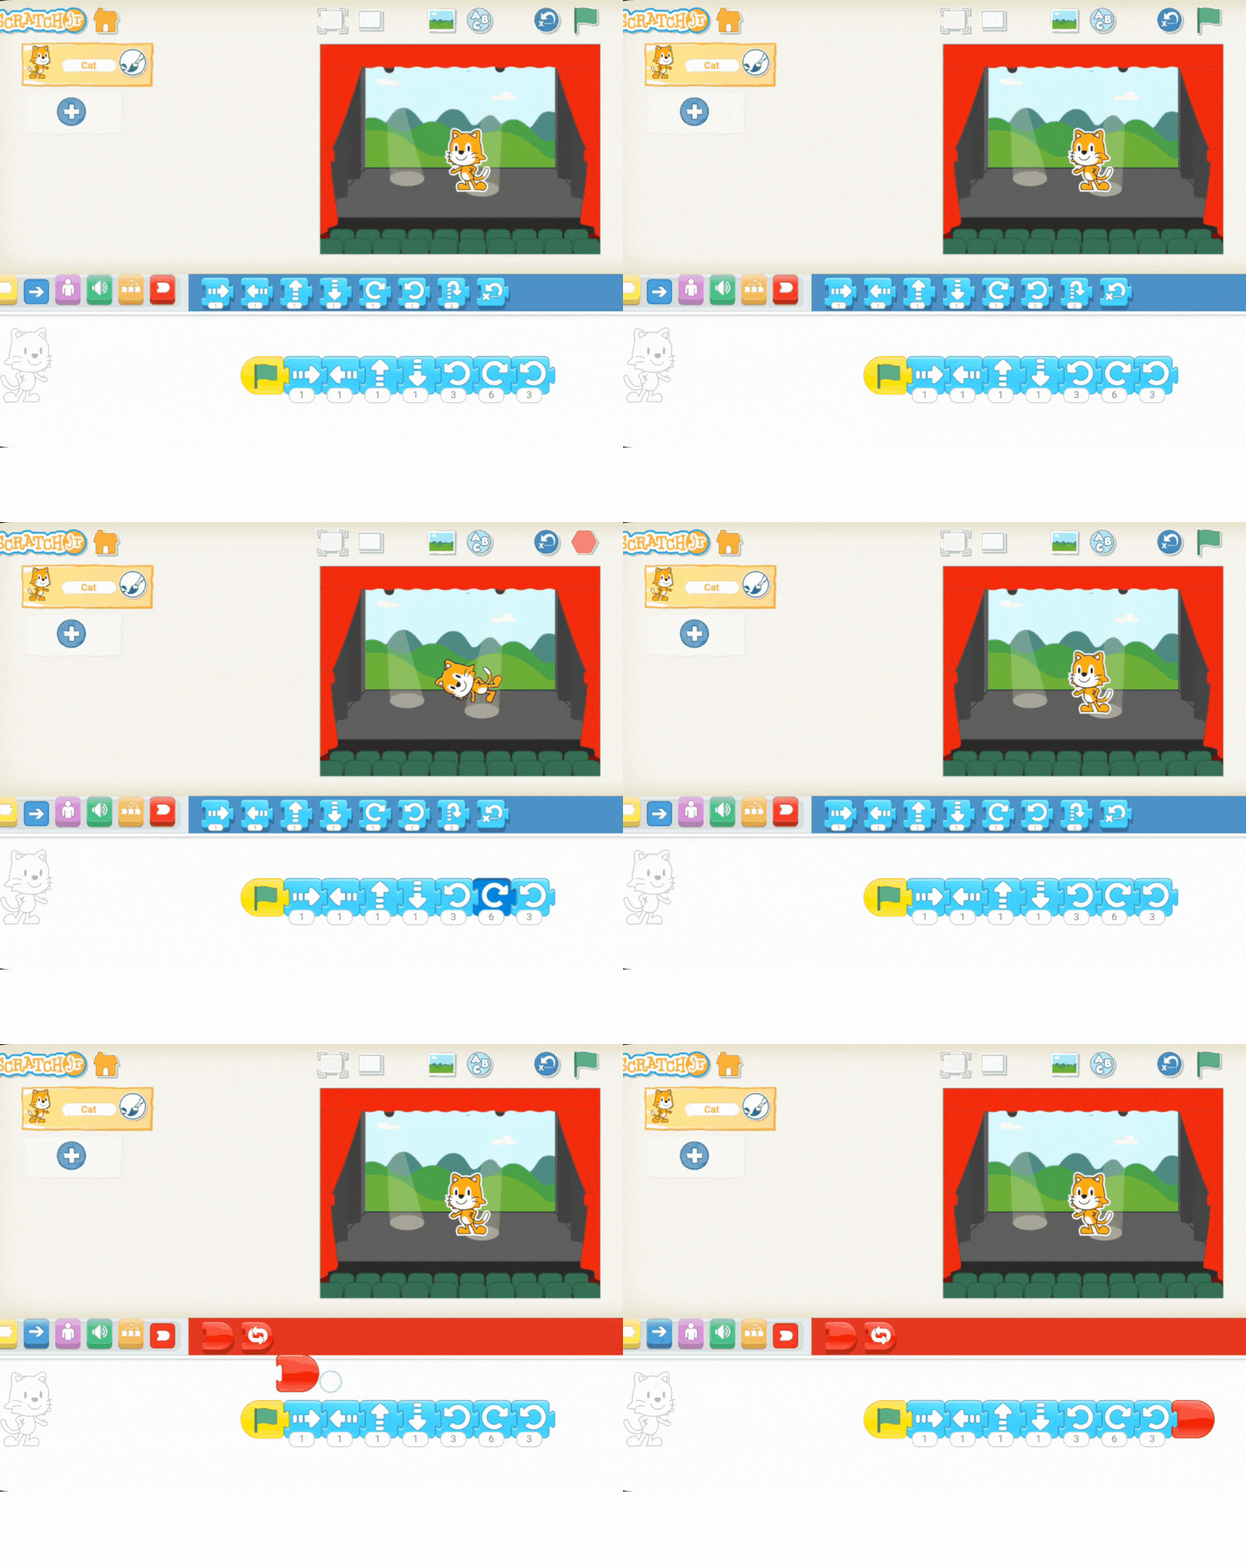
    1. Start the Program: Instruct the students to drag the green flag block into the coding area. This is the start of their dance sequence.

    2. Code the Moves: Encourage them to be creative! They should incorporate as many different movement blocks (forward, backward, left, right, spin, jump, etc.) as they like, snapping them together in the order they want Scratch to perform the dance.

      • For Example: They might start with a few steps forward, followed by a jump to the left, a spin to the right, and a final move backward.

    3. Test the Sequence: Once all the movement blocks are in place, remind the students to click the green flag above the screen. They can now watch Scratch the Cat perform the exact dance routine they have programmed!

    Encourage them to watch closely and make any changes they think will improve the routine! This is the essential programming step of debugging.


    8 - Wrap up

    As we conclude our lesson, take a moment to review everything the students accomplished. Congratulate them on successfully coding a dance routine for Scratch the Cat!


    Reviewing the Algorithm

    Remind the students of the steps they took to build their first project:

    • User-Friendly Interface: They learned how to open Scratch Jr. and navigate the screen.

    • Controlling the Character: They explored the basic movement blocks and figured out how to use them to tell Scratch the Cat exactly where to go.

    • Sequencing and Events: They understood the importance of the green flag block and arranging the movement blocks in the correct sequence (their algorithm) to make the dance work.

    • Creativity: They chose a background to set the scene and combined all the elements to create a fun and exciting final product.


    Skills for Life

    Finally, emphasize that the skills they learned today are valuable far beyond the screen:

    • Sequencing: Putting steps in the right order (like following a recipe).

    • Problem-Solving: Figuring out why Scratch didn't move as expected and fixing the code (debugging).

    • Creativity: Designing a unique dance routine.

    Encourage them to keep exploring, keep learning, and, most importantly, keep having fun with coding! They've established a strong foundation for their coding journey.

    End of lesson
    123learn · Sample lesson

    That was a sample lesson from Adventures in Digital Creation

    Every lesson in the course is ready to teach like this one. See what else comes with it, and how to order it.

    Copyright Notice
    This lesson is copyright of Coding Ireland 2017 - 2026. Unauthorised use, copying or distribution is not allowed.
    🍪 Our website uses cookies to make your browsing experience better. By using our website you agree to our use of cookies. Learn more