Intermediate
40 mins
Teacher/Student led
+65 XP

What you need:
Chromebook/Laptop/PC

Editing Video with Snip Studio, Part 1: Import, Sequence and Trim

Students build a short video sequence in Snip Studio, a free browser video editor that needs no account. They import their own clips and a music track, place the clips on the timeline in a deliberate order, trim each one to the length it needs, and save the project to finish next lesson. The lesson makes the central point of editing plain: most of video editing is deciding where to cut, and the order of the cuts is what tells the story.
Teacher Class Feed

Load previous activity

    1 - Start ~4 mins

    Watch two versions of the same three clips, cut in a different order. What does each version say happened?

    Version 1

    Version 2

    Same footage, nothing added. The order did all the work.

    Today you build your own sequence. Next lesson you finish it, and re-cut it to see the effect for yourself.

    2 - What a Timeline Is ~4 mins

    A video editor shows your footage as a timeline: a strip running left to right, where left is the start and right is the end.

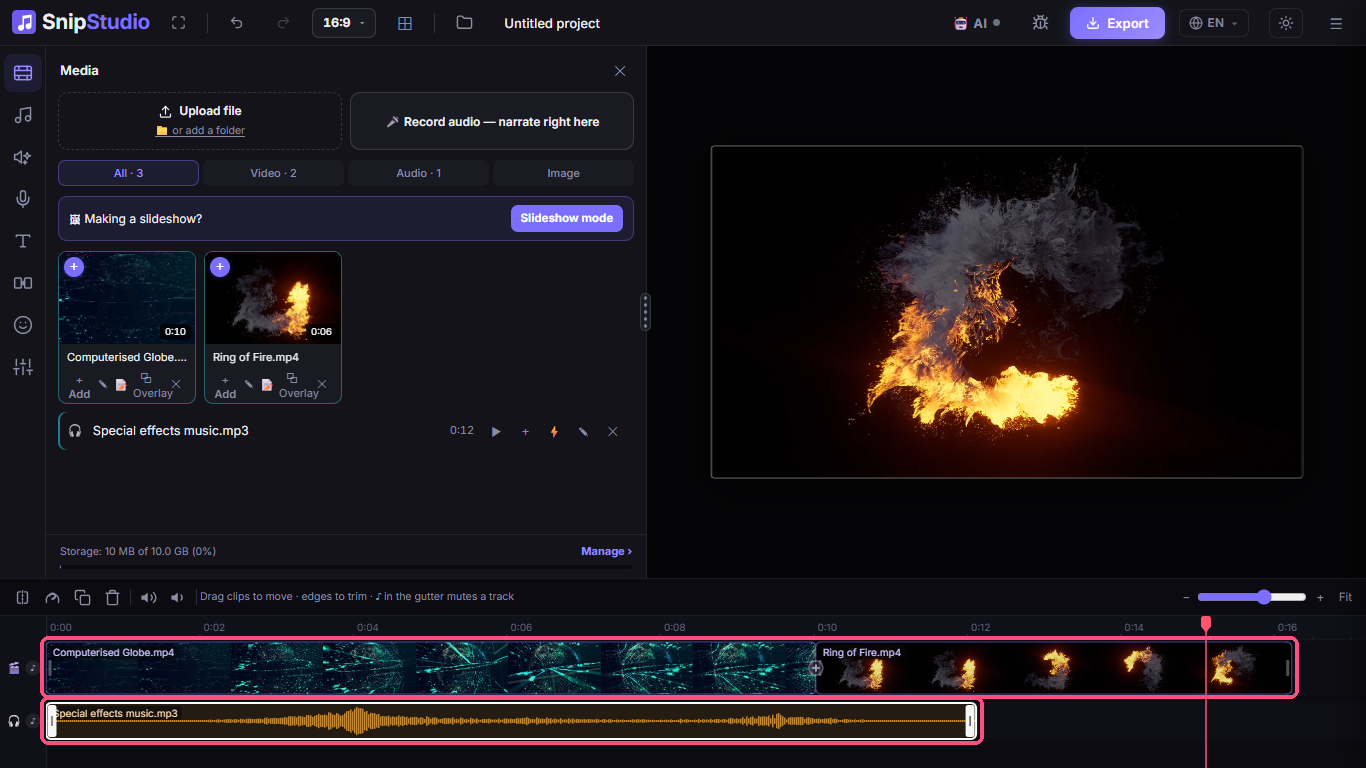
    The Snip Studio timeline: two clips in order on the video row, and the music on its own row underneath

    Clips sit on the timeline in the order they will play. Making a clip shorter is called trimming. Rows play at the same time: music on its own row plays under the pictures, and a title on its own row shows over them.

    Almost everything you do to a video is one of those three: order, trim, layer.

    3 - Import and Build Your Sequence ~13 mins

    Snip Studio runs in your browser at snipsound.com/video-editor. There is no account to make and nothing to install, and your clips stay on your own computer.

    Then bring in your clips and put them on the timeline in the order you want them seen.

    No clips saved from the sourcing lesson? Take three minutes now and grab two or three short ones from Pixabay, the same way you did then, and check the licence before you download.

    For the music, use the thirty-second clip you made in the AudioMass lessons. If you do not have it, download one short music track from Pixabay the same way.

    4 - Trim to Length and Save ~14 mins

    Now tighten it. Trim each clip so it runs only as long as it needs to, and make the music end with your last picture.

    Keep playing it back. Editing is a loop of change, watch, change again. Then name your project, so it is there to finish next lesson.

    5 - Make Sense ~3 mins

    You have a sequence: your clips in order on one row, the music on the row underneath, each cut to a deliberate length.

    Key point

    Nothing here was invented. Every decision was about what to keep, how long to keep it, and what comes first. That is editing.

    What would change if your first clip ran twice as long?

    123learn · Online learning platform

    Unlock the full learning experience

    You're previewing this lesson. Get full access to this lesson and hundreds more — each one ready to teach, with interactive activities, printable resources and pupil progress tracking built in.

    Hundreds of curriculum-aligned lessons
    Interactive activities in every lesson
    Printable resources & progress tracking
    Copyright Notice
    This lesson is copyright of Coding Ireland 2017 - 2025. Unauthorised use, copying or distribution is not allowed.
    🍪 Our website uses cookies to make your browsing experience better. By using our website you agree to our use of cookies. Learn more