1 - Getting Started ~5 mins
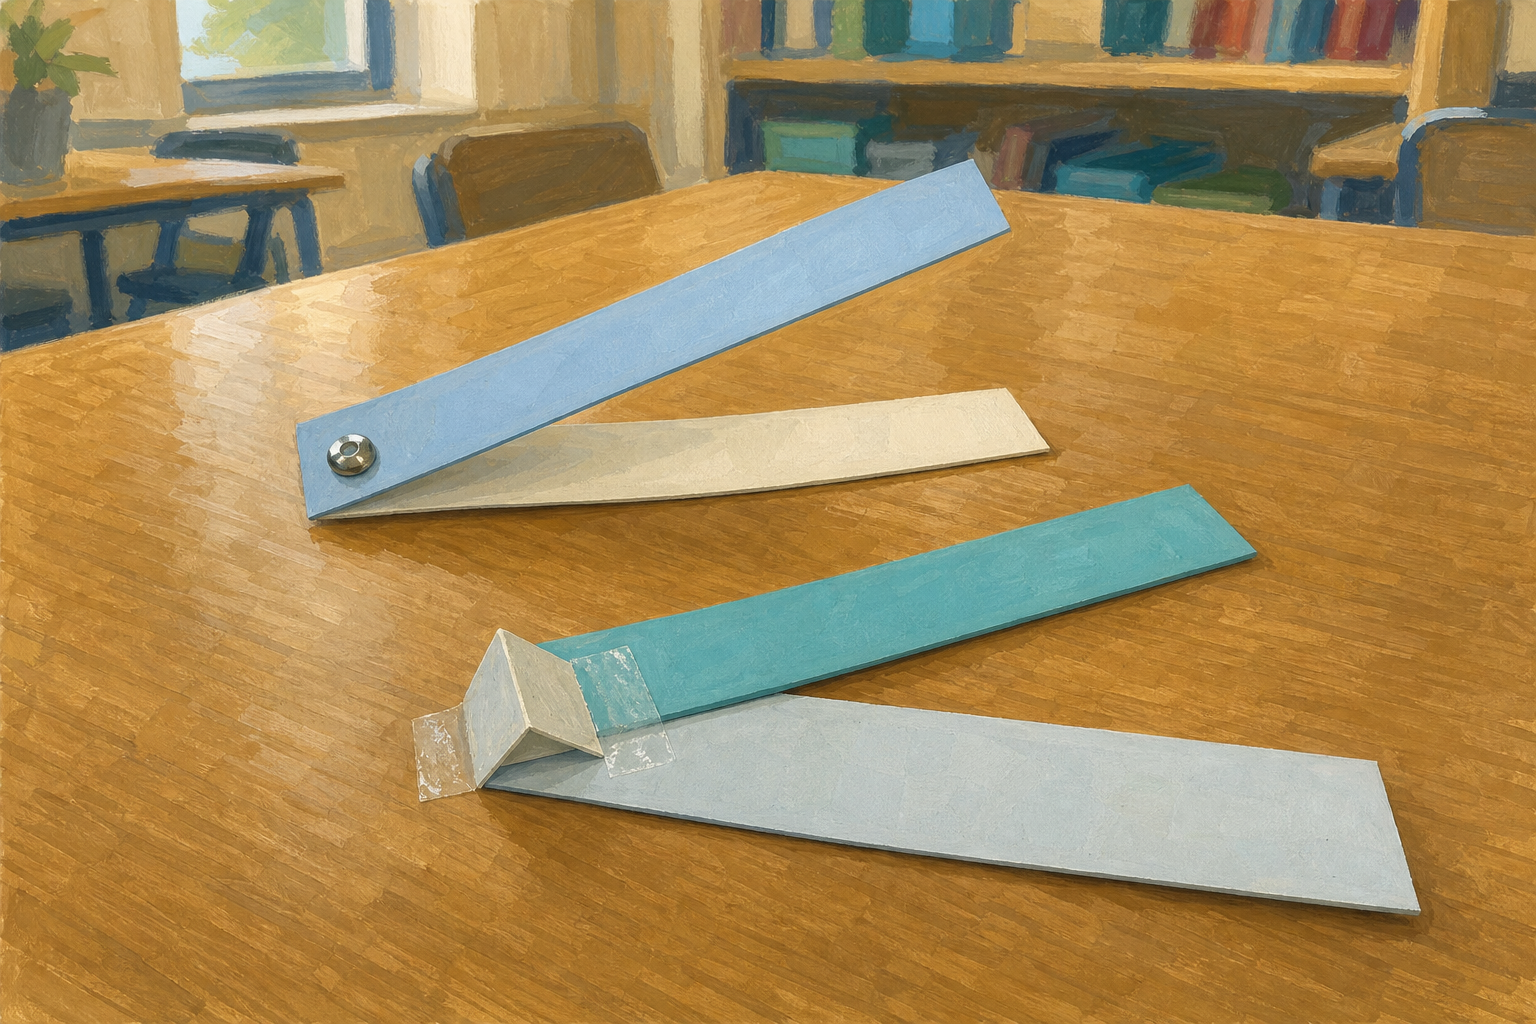 Look at these two joins. Both hold two strips of card together.
- One swings like a gate.
- One locks and will not lean (think of a shelf bracket or a picture-frame corner).
A farm gate needs to swing. A shelf must not. Today we will make the same joint a few different ways, load each one until it fails, and find out which joins hold firm and which let parts pivot.
Hold up two pre-made samples only: one split-pin join that swings, and one triangular gusset fixed with sticky tape that locks. Do not lay out the full kit or name all the joins yet.
Ask: Where in this room do we need a join that swings? Where do we need one that must not move? Take three or four quick answers (door hinge, cupboard door, shelf bracket, chair frame, picture-frame corner).
Nature of STEM cue: Irish farm gates use pivot hinges on purpose; shelf brackets, goal-post corners and roof braces must not pivot. Makers choose the join to match the job.
2 - What Holds a Join Together? ~5 mins
 Those two samples show the big idea: some joins lock, and some joins swing on purpose.
Firm join locks the parts so they cannot swing.
Pivot join holds the parts but lets them turn, like a hinge.
We will make the same simple joint three ways: a sticky-strip wrap, a split pin, and a triangular gusset (a small triangle of card that locks a corner) held with sticky strips. Which do you predict will hold the most load before it fails, and which will swing?
Board stays short: firm vs pivot, then the three join names. Use the table below yourself; do not project it. Leave peel / tear / swing language for the load test once children have seen a fail. Say “sticky tape” aloud even if the board uses “sticky strip” — same material.
| Concept | Why it matters | Example |
|---|---|---|
| Join — the way two parts are fixed together so they act as one piece, or so one can move on the other | A design is only as strong as the way its parts are fixed; a strong shape fails if the join peels or tears | Two equal card strips joined at one end by sticky tape, a split pin, or a gusset |
| Firm join — a join that locks the parts so they cannot swing or slide at the joint | Shelf brackets, picture-frame corners and braces need firm joins or the structure leans | A triangular card gusset fixed with sticky tape across a corner stops the angle from changing |
| Pivot join — a join that holds the parts together but lets them turn around the joint | Gates, cupboard doors and some tools need a controlled swing; the wrong join on a shelf would be dangerous | A split pin through punched holes lets two strips swing like a hinge |
Worked example (keep this tight: under 2 minutes)
Before groups build, model the sticky-tape join only, thinking aloud. Use one pair of strips already joined with sticky tape and a string loop. To protect the 5-minute slot, start with about 3–4 coins already on the loop so you only add a few more until it peels — do not run a slow coin-by-coin climb from zero.
- I wonder: Will a simple sticky-tape join hold a small hanging load, or will it peel?
- I predict: I think the sticky tape will peel off the card before the card tears, because it grips the surface only.
- I test: Strips meet like an open V (about a right angle) with about 2 cm overlap; sticky tape wrapped once. Hang from the free end. Gently try the angle — lock or swing? Then add the last few coins slowly, standing clear. Stop at peel.
- I observed: After a few more coins, the sticky tape peels back and the load drops. The card is not torn.
- I think: This join failed by peeling, not by tearing. Sticky tape can work for light jobs, but under a hanging load the surface grip gives way first.
Misconception to head off lightly: children may say one join is always “best”. Strength depends on the job. Evidence from today’s loads decides.
Ask before they build (protect this beat): Hands up: which of the three joins do you think will hold the most coins? Which one will swing? Note two or three predictions aloud; they are the start of the science, not answers to mark. Pupils will write their own prediction on the Investigation Journal page in the next recording beat.
Stretch (name only if needed): confident groups who finish early may also test a pre-dried PVA sample you prepared overnight, or a folded-tab sample with adult-cut slits — not part of the default three.
3 - Make Three Identical Joins ~12 mins
Your group will make the same simple joint three ways so we can compare them fairly.
Shared set-up first (every sample, every time): two equal card strips joined at one end so they meet like an open V (about a right angle), with about 2 cm overlap. Match that angle and overlap before you fix anything. Only the join type changes.
Fair samples make fair evidence — take a moment on the shared shape before each fix.
Then make each join one at a time (listen for the how-to as you reach it):
- 1. Sticky strip: overlap the ends about 2 cm at the V; wrap sticky strip once around the overlap.
- 2. Split pin: use the holes already punched, or wait for the adult at the punch — do not push a sharp pencil through on your own. Open the pin legs flat on the back so the strips can swing.
- 3. Triangular gusset: a gusset is a small triangle of card that locks a corner. Place it across the joint so it covers both strips; fix all three edges with sticky strip so the angle cannot change.
Label each sample. Lay the three ready in a row.
Before this step
Give each group a set of pre-cut equal card strips (about 15 cm), sticky tape, split pins, scissors, spare scrap card for the gusset, and pencils for labels. Pre-punch two holes per group if you have only one hole punch, or station an adult at the punch so groups are not queued. One adult helps with tricky cuts. Tell the class aloud: use pre-punched holes or wait at the punch — no improvised sharp tools.
Lead with the shared geometry (say this before any how-to)
All three samples use the same set-up: two strips meeting at one end like an open V, about a right angle, with about 2 cm overlap. The only change is the join type. Keep this on the board as a short reminder while groups build. Reveal or call out each join how-to as groups reach it so the fair-test rules are not buried under three recipes at once. Do not let groups make a straight lap for sticky tape and angled corners for the others.
How each join is made (call out one at a time; walk the room)
- Sticky tape: overlap ends about 2 cm at the V; wrap sticky tape once around the overlap.
- Split pin: use pre-punched holes through both strips in the overlap (or adult at the punch); open the pin legs flat on the back so the strips can swing.
- Triangular gusset: cut a small card triangle; place it across the joint so it covers both strips; fix all three edges with sticky tape so the angle cannot change. Check by trying to change the angle — it should lock.
Fair-test reminder: same strip length, same open-V starting angle, same overlap, same hanging point later. Only the join type changes.
Default is three joins. Do not push five in twelve minutes. Success is three well-made, labelled samples.
Extension if a group finishes cleanly: (1) a pre-dried PVA overlap you issued from overnight prep, or (2) a folded-tab sample — only if you pre-cut the slits (two short cuts and a tongue on one strip; matching slit on the other). Do not invent slit-cutting mid-lesson for the whole class.
Differentiation: less confident groups still make all three core joins with extra adult support on the gusset. Confident groups add one extension sample only after the three are labelled and fair.
4 - Load Each Join Until It Fails ~12 mins
Engineers care how something fails, not only that it failed — watch the join itself.
Test one join at a time. Follow this order every time:
- Hang free: hang the sample from a safe hook or chair back by the free end of one strip so the join hangs in empty air (not pressed against the chair).
- Check lock or swing: gently try to change the angle at the join. Does it lock or swing?
- Add coins: add 1c coins one at a time into the hanging cup or on the string loop. Stand clear underneath.
- Stop: when the join fails, or when you reach 20 coins if it still holds.
- Jot straight away: on scrap paper write the join name, the coin count, and what moved (peeled, tore, swung, or held). Keep this scrap for the journal write-up next.
- Next sample: only start the next join after you have written — do not wait until all three are done.
Set-up
One loading station per group: a chair back or clamp, string, a light paper cup or bulldog-clipped loop, and a tub of 1c coins (or metal washers if coins are short). Demonstrate safe loading once: coins added slowly, feet back, catch the cup if it drops. Give each group a scrap sheet (or the back of scrap card) for write-as-you-go jottings — coin counts live here first, not on the journal page yet.
Make firm vs pivot visible
Hang from the free end of one strip so the joint is free in air — not jammed against the chair back. Before counting coins, each group gently tries to change the angle and notes lock or swing. That check matters: under pure end-to-end tension a split pin can “hold” without the class seeing the pivot behaviour. The later braced-corner task then proves gusset locking under a corner load.
Write as you go
Insist on a quick jot after each sample (join name + coins + how it failed) on scrap paper. Step 5 turns those jottings into full sentences on the Investigation Journal page — it is not a memory test. Circulate and check scrap notes before groups move on. Keep the numbered order visible on the board so the jot beat stays as clear as the coin counting.
Class stop rule (same for every group)
Fail, or stop at 20 coins and record “held 20”. Do not invent private “high load” cut-offs.
What to measure
- Load held: number of coins at the moment just before failure, or 20 if it held.
- How it failed: peeled / tore / swung / held (name what actually moved).
Pivoting is not always failure: pivoting is only a problem if we needed the joint to stay firm. On a gate, pivoting is success. Record “swung” as what happened; decide later whether that matched the job.
What to expect (rough guide, not a mark scheme): sticky tape often peels at a low-to-medium count; split pin usually swings rather than locking and may tear at the hole under higher load; a well-made gusset often holds the highest load and fails at the sticky-tape edge or card, not by swinging. Real results vary with sticky-tape quality — trust the group’s evidence.
If a group has an extension sample (pre-dried PVA or folded tab), test it after the three core joins and add one extra scrap jot line.
Key questions while you circulate: What is the one thing we are changing? What are we keeping the same? What did you see happen at the joint, not just that it “broke”?
Safety: load low and slowly; stand clear as a join fails; adult supervises scissors still on tables; no standing on chairs to hang samples.
5 - Record What Held and How It Failed ~6 mins
Your coin counts are the evidence. A surprising low score still counts — do not tidy the numbers to match your prediction.
Open your Investigation Journal page. Use your scrap jottings from the load tests. Fill these parts now:
- Our question: write Which join holds the most load before it fails, and how does each fail?
- I predict … because …: finish the stem with the join you thought would hold most (or swing), and one reason.
- What I found out: write one short sentence for each join from your scrap notes. Use the stem The … join held … coins. It failed when the … (or It held 20.).
The sticky-strip join held 6 coins. It failed when the strip peeled off the card.
Leave two blank lines at the bottom of What I found out labelled L before and L after — you will add coin counts there when you strengthen a weak join.
Leave the firm / pivot sort table empty for now — you will fill that next.
This is the paper recording beat inside the lesson — not homework. Nothing is typed into the platform.
Match the printed Investigation Journal page only. The page that ships has sections such as Words to use, Our question, I predict … because …, Words to sort / a firm–pivot table, and What I found out. It does not have a ready-made three-column results grid. Do not ask pupils to find “ExperimentRecord rows” or draw a second mini-table unless a group has no scrap space left — the scrap jottings from step 4 hold the raw numbers, and What I found out holds the written sentences.
Board support: put the question stem, the prediction stem, one filled “What I found out” example, and the two labels L before / L after on the board so the page is obvious.
Look-fors:
- Our question is filled.
- I predict has a join name and a because clause (even a short one).
- What I found out has one sentence per tested join with a coin number (or “held 20”) and a specific fail word — not just “broke”.
- Children do not erase a “surprising” low score; unexpected results are data.
- Two blank lines labelled L before and L after sit ready under What I found out.
- The firm / pivot table is still empty (filled in step 6).
If a group only finished two joins: two complete sentences beat three empty ones. Note which sample is still to test.
If a group has no scrap jottings: they re-test one sample quickly rather than invent numbers.
Unlock the full learning experience
You're previewing this lesson. Get full access to this lesson and hundreds more — each one ready to teach, with interactive activities, printable resources and pupil progress tracking built in.
This lesson is copyright of Coding Ireland 2017 - 2025. Unauthorised use, copying or distribution is not allowed.