1 - Getting Started ~5 mins
 Someone in our school needs something that can hold a real load without falling or tipping. Who might that be, and what might they need held up?
Keep this light. Do not hand out kit or name variables yet. Take three or four quick ideas from the floor (books, a tablet, wet coats, a gap in the yard) and leave the choice open for groups.
Key question: Who in our school struggles because nothing holds the load they need?
Link gently to what pupils can already do: they already know that triangles hold their shape, that the shape of a span decides how much it carries, and that some joins hold firm while others pivot. Today those ideas start a real project for a real user.
2 - Test Small Before You Build Big ~6 mins
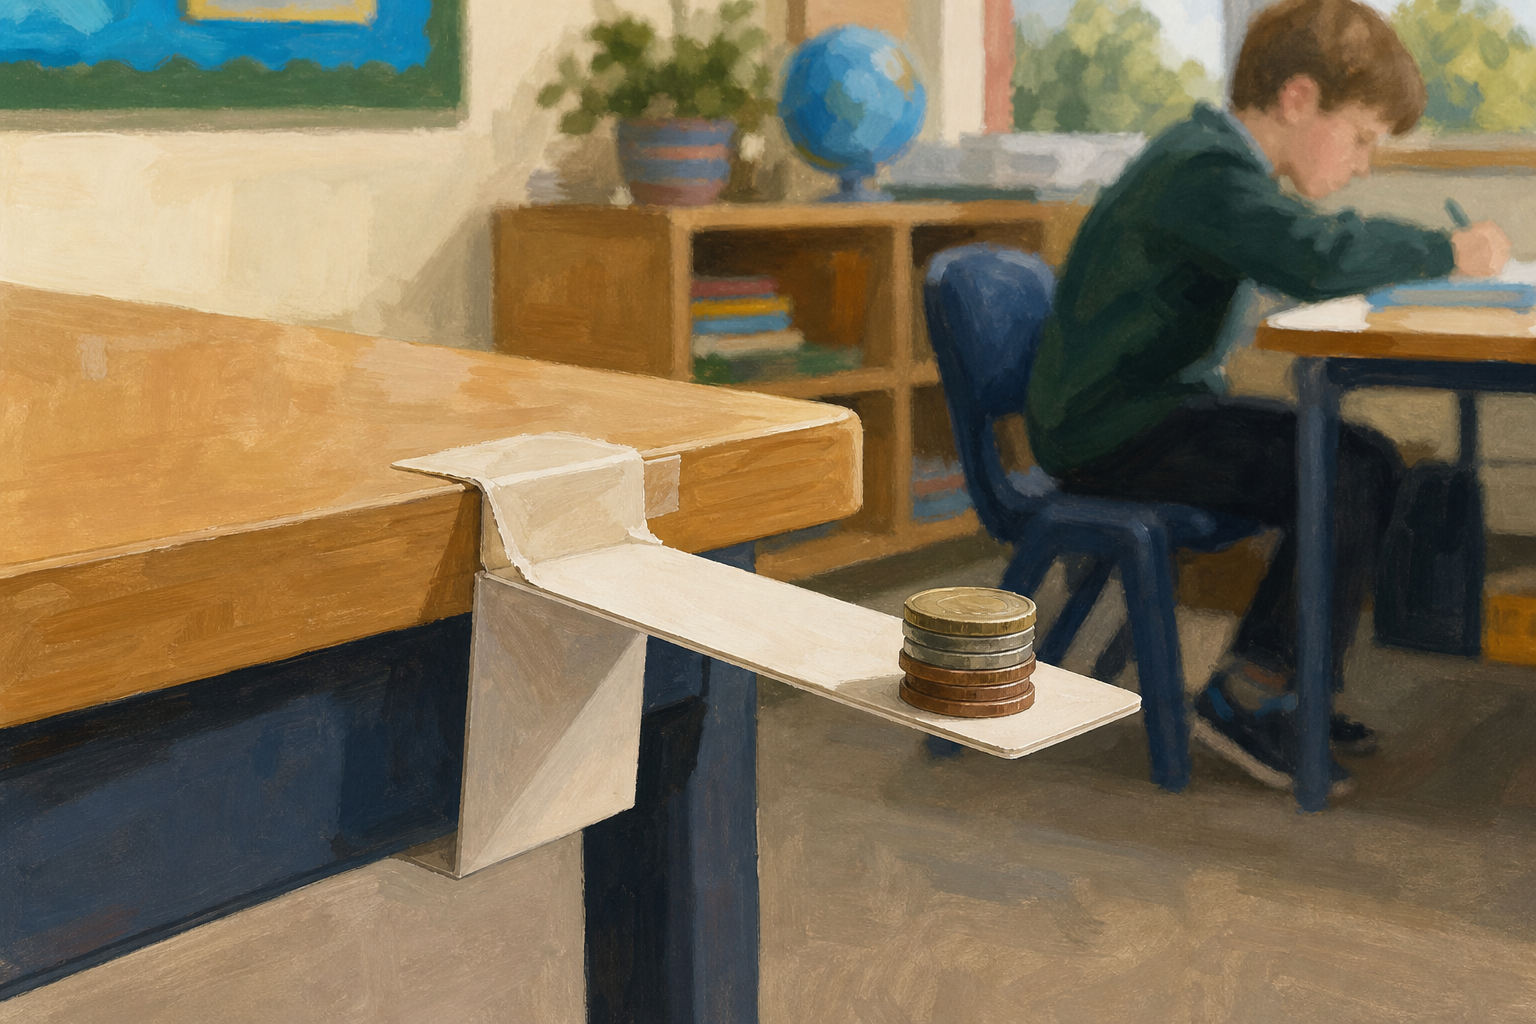 While we load: Watch this small shelf bracket on the desk edge. I will add coins one at a time until something gives way. What do you think will fail first: the triangle shape, or the tape join?
After it fails (reveal next): We pin two plain ideas from what we saw:
- Who needs help, and what must be held up (the user need).
- Must-do list: the two or three things the big build must not do, taken from what broke.
The way it failed (for example a tape peel at the back) tells us what to fix. The real user need sets the real load — for a library shelf that might be four books. Coin count is not the success target for the full build.
We tested a small version on purpose so the weak spot shows early. Why is that useful before we build the real thing?
Prep before this step: Pre-build one rough half-size shelf bracket from three card strips joined as a triangle with sticky tape (and a small card platform at the outer end). Do not build it live. Today you only predict, load, and talk. Place it on a desk edge so the fail matches what pupils see (tape peel at the back join), not a wall mount.
Protect the core in six minutes — sequence the board:
- Predict and watch only while you load (show only the first line on screen).
- Stop at the fail. Name what failed in plain words (shape held / tape peeled / tipped).
- Then reveal the two plain board labels and the short why question. Do not leave the after-fail list visible during the prediction.
Board labels only (two, plain), pinned after the fail:
- Who needs help / what must be held up
- Must-do list (from what broke)
Say one plain line out loud after the fail: How it failed tells us what to fix; the real user need sets the real load. Eight coins is not four books. Treat the deeper "why engineers break models" talk as optional if the clock slips; one sentence is enough.
Do not pin a third formal term. Pupils experience "test a small version" through the demo; keep half-size test language for teacher notes and later steps rather than a vocabulary block now.
| Concept | Why it matters | Example |
|---|---|---|
| User need — who in the school needs help, and what must be held up for them | A strong build that nobody needs is not good engineering; the user decides the job | Coats pile on the floor by the door, so a hook rail that holds wet coats would help the class each wet morning |
| Must-do list — two or three clear things the full build must do, written from what failed | Criteria taken from a real failure are measurable, not vague wishes like "make it strong" | After the small shelf tips forward: hold four books; not tip when loaded at the front |
| Half-size test (teacher language; not a board term today) — a quick small model loaded until something gives way | Breaking the small one shows the weak spot cheaply, before you spend time on the full build | A half-size card bracket peels at the tape when three coins sit on it, so the join is the problem to fix |
Worked example (live load only, thinking aloud): Place the pre-built bracket on the desk edge. I wonder which part will give way first. I predict the tape join will peel before the triangle changes shape. Add 1c coins one at a time at the outer end. When the tape peels and the bracket drops, stop. I observed the triangle held its shape, but the tape peeled at the back join after about eight coins. The peel tells us the join is the problem to fix. The library tells us the real job is four books — not that eight coins equals four books. So our must-dos are: hold four reading books, and the back join must not peel. We will need a gusset or a better fixing, not more tape.
Misconception to head off: pupils may think breaking the small piece means the idea is "bad". Frame failure as useful data. Engineers load scale models on purpose so the weak spot shows early. Also head off the idea that coin count scales straight to book count: failure mode guides the design fix; the real user need sets the real load target.
Nature of STEM: engineers test a scale model to destruction before committing to the real thing. That habit saves materials, time and unsafe surprises on the full build.
Keep the board version short: two plain lines pinned after the demo, not a dense definition block before anything happens.
3 - Choose the Job and the User ~6 mins
In your group, pick one real school job that has to hold something up. Someone nearby is waiting for a better answer than a pile on the floor. Ideas on the board:
- a shelf for the classroom library
- a stand that holds a tablet at reading height
- a hook rail that takes wet coats
- a small classroom model of a bridge for the wet corner of the yard
Name who it is for, what load it must hold, and why that person or place needs it. Use a board idea or invent another school job that holds a real load and can later be built on a desk from card, sticks, tape, pins or string. No building yet — talk it through first.
Before this step
Have the shortlist ready on the board (not as a sheet the teacher draws): a shelf for the classroom library; a stand that holds a tablet at reading height; a hook rail that takes wet coats; a small classroom model of a bridge for the wet corner of the yard. Groups may adapt these or propose another school job that holds a load and can later sit on a desk made from card, sticks, tape, split pins or string.
Kit stays put away for this beat. Do not surface build materials, one-shape/one-join rules, or half-size constraints on screen yet — those arrive in the next step. This step is a spoken job-and-user decision only. The materials cue on screen is only a functional limit so groups do not lock an outdoor full-span brief they cannot honour later.
How to run it
Two minutes of quiet think, then groups talk. Each group must say out loud: who, what load, and why it matters. Fold the whole class in by asking watchers: Does that sound like a real need? What load would you measure?
Look-fors:
- The user is a real person or place in the school, not a made-up character
- The load is something they could actually test later (books, a tablet, coats, a bag of sand or water bottle for a bridge model)
- Groups can point to a struggle they have noticed (books sliding, coats on the floor, tablets propped on books)
Bridge jobs: this is a classroom prototype of a yard need, not a full outdoor span. Keep today's half-size failure obvious with coins at mid-span on a short desk model. Note a bag of sand or a water bottle as the later full-load target so the real success criterion stays realistic.
Differentiation: less confident groups take a job from the shortlist; confident groups may refine the brief ("a shelf that holds four books and does not tip when you pull the front book").
Do not let groups start building yet. Capture the choice on the DesignBrief later; for now a spoken decision is enough.
4 - Build a Half-size Test Piece ~15 mins
Now build a half-size version of your idea. Half-size means a model that fits on the desk — roughly half as tall or half as long as a full classroom version of the job (a shelf or stand that could sit on a table, or a short desk-edge span for a bridge model). Neat measuring is not the point today. A rough piece is enough.
Use one strong shape you trust (a triangle, a tube, an arch, or a flat strip with a triangle stuck under it) and one main join that holds straight away (tape, a split pin, or string). It only needs to stand and have a place to put a load. You have about fifteen minutes. Keep it small so we can break it on purpose next.
Setup
Kit per group on the desk before you say go: card strips and scraps, a few lolly sticks, sticky tape, split pins, string, scissors. Rulers for a rough half-size check. You (or an SNA) make any tricky cuts. Do not put PVA glue out for this step. Glue needs drying time and will fail wet in the next load test, teaching the wrong lesson about weak spots. PVA is for a later full-size lesson in this project when there is drying time between lessons.
Teaching tips
Remind them of the durable ideas they already hold: a triangle will not rack the way a loose square will; an arch or a flat strip with a triangle under it carries more than a flat strip alone; a gusset, split pin or firm tape wrap holds better than a single peel of tape. They choose one shape and one main join so the failure later is easy to name.
Same-lesson joins only: sticky tape, split pins, string or ties. Glue is not a load-path join today.
Half-size is classroom scale for every job. Anchor every shortlist choice to a piece that stands on the table and can be loaded with light weights in this room: shelf or stand height that fits on a desk; bridge as a short desk-edge span, not half of a yard gap. Groups have not locked a full-size outdoor measure — "roughly half as tall or half as long as a full classroom version" is the cue. Stop groups who try to build the full thing or an outdoor-scale span.
Common pitfalls:
- Using five different joins so nobody can tell what failed
- Building too big and running out of time
- No clear place to put the load (add a small card platform or hook)
- Reaching for glue: redirect to tape, pin or string
- Stalling on exact half: reassure that rough is fine
- Treating a yard bridge as a long outdoor span: redirect to a short desk model of that need
Differentiation: offer a starter triangle or tube to groups who freeze; challenge fast groups to make the load point clearer or to mark the shape and join with a pencil label on the piece itself.
Safety: adult help with scissors; no heavy tools.
5 - Load It Until It Fails ~12 mins
Engineers break the small one on purpose so the weak spot shows early. Add light weights one at a time at the load point. Stop when something sags, tips, peels or breaks. Say out loud what gave way first and roughly how much it held — that failure is useful news, not a mess.
How to run the test
Clear a desk space per group. Weights stay light: 1c coins, washers, or small counting cubes. For a hanging load, use a yoghurt pot on string and add coins into the pot. Load low and slowly. Everyone stands clear of the fall zone.
Model one group's first two weights if needed, then circulate. Ask the rest of the class when a group is about to fail: What do you think will give way first, the shape or the join?
What to listen for:
- "The tape peeled at the back" (join failure)
- "The flat strip bent in the middle" (shape or span failure)
- "It tipped forward before anything broke" (stability / load position)
If nothing fails: add load until it does, or gently push sideways once to find the weak direction. A piece that never fails still needs a note: "held all our coins; next time we need a heavier real load."
Misconception: "We must start again with a new idea." No. The failure names the one thing the full build must fix. That is the point of the half-size test.
Groups keep the broken or bent piece for the DesignBrief. Do not bin it yet.
Unlock the full learning experience
You're previewing this lesson. Get full access to this lesson and hundreds more — each one ready to teach, with interactive activities, printable resources and pupil progress tracking built in.
This lesson is copyright of Coding Ireland 2017 - 2025. Unauthorised use, copying or distribution is not allowed.