1 - Start: What We're Building ~5 mins
Last day we used HTML to build the structure and content of a web page. Quick recap: what does an HTML tag like a paragraph tag actually do?
Today we move on to CSS — the language that styles that content, changing colours, sizes and layout. We'll build an Introduction to CSS page step by step at our devices: predict first, then build, run, and fix.
Open with the recap question about HTML tags to bridge from last day's structure work to today's styling. Make clear we are not listing the code yet — just framing what the finished page should do. Cue: ask students to picture the difference between building a page and decorating it.
2 - Predict Before You Run ~10 mins
Before anyone runs anything, look at what we are about to build. Commit to a prediction: when this CSS runs, what will change on the page? Which text do you think will change colour or size first?
Hold your prediction — we'll come back to it later to see who was right.
This is the PRIMM predict beat. Collect two or three predictions about what will change on screen and park them on the board to revisit at the make-sense step. Key question: which line of text do you expect to change first? Hold students back from running anything yet.
3 - What Is CSS? ~3 mins
We have already learned about HTML, which is a coding language to create the structure and content of web pages.
CSS stands for Cascading Style Sheets and is a programming language for styling the content of web pages. CSS applies styles to HTML elements and can change how they look on the web page.
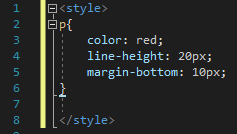
For example we could use the following CSS code to define how all paragraphs on a website appear:
p{
    color: red;
    line-height: 20px;
    margin-bottom: 10px;
}
So anywhere we use a <p></p> tag in the HTML code, the text will:
- appear red.
- have a line height of 20 pixels.
- have a bottom margin of 10 pixels.
Model on the board how CSS sits alongside HTML — structure versus style. Ask: what is the job of HTML, and what new job is CSS doing? Watch for students thinking CSS replaces HTML rather than styling it. Support: keep the HTML they already know visible for comparison.
4 - CSS Rules ~3 mins
We call the CSS that we write rules. We can write a CSS rule for paragraphs of text, for images, for tables etc. A CSS rule has a selector and a declaration block.
The selector is the HTML element you want to create the rule for and the declaration block has the style rules for that HTML element.
h2{
    color: green;
    font-size: 18px;
    text-align: center;
}
In the above CSS code the selector is the h2 element and there are 3 rules specified in the declaration block. These rules are contained inside curly braces {} and each rule has the CSS property name (e.g. color) and the value that should be applied (e.g. green). The property and the value is separated with a semicolon :
Take a look at the below HTML and CSS code and notice how it creates a CSS rule for the h2 element and that the rule gets applied to each of the <h2></h2> tags.
On the board, name the two parts of a rule clearly: the <strong>selector</strong> and the <strong>declaration block</strong> inside curly braces. Key question: how many separate rules are inside one block? Common bug to flag: forgetting the semicolon between rules. Extension: ask which part you'd change to alter the colour.
5 - Element Selector ~3 mins
As mentioned above, the CSS selector is the HTML element that you want to create the rule for. There are different ways that we can select which HTML elements to apply the rule to.
Element Selector
As in the above examples we can select a HTML element to apply the rule to.
p{
    color: blue;
}Model the element selector first since it's the simplest. Ask: if we write a rule for the paragraph element, which lines of text will be affected and which won't? Watch for students expecting headings to change too. Support: have them change only the colour value at first.
Unlock the full learning experience
You're previewing this lesson. Get full access to this lesson and hundreds more — each one ready to teach, with interactive activities, printable resources and pupil progress tracking built in.
This lesson is copyright of Coding Ireland 2017 - 2025. Unauthorised use, copying or distribution is not allowed.