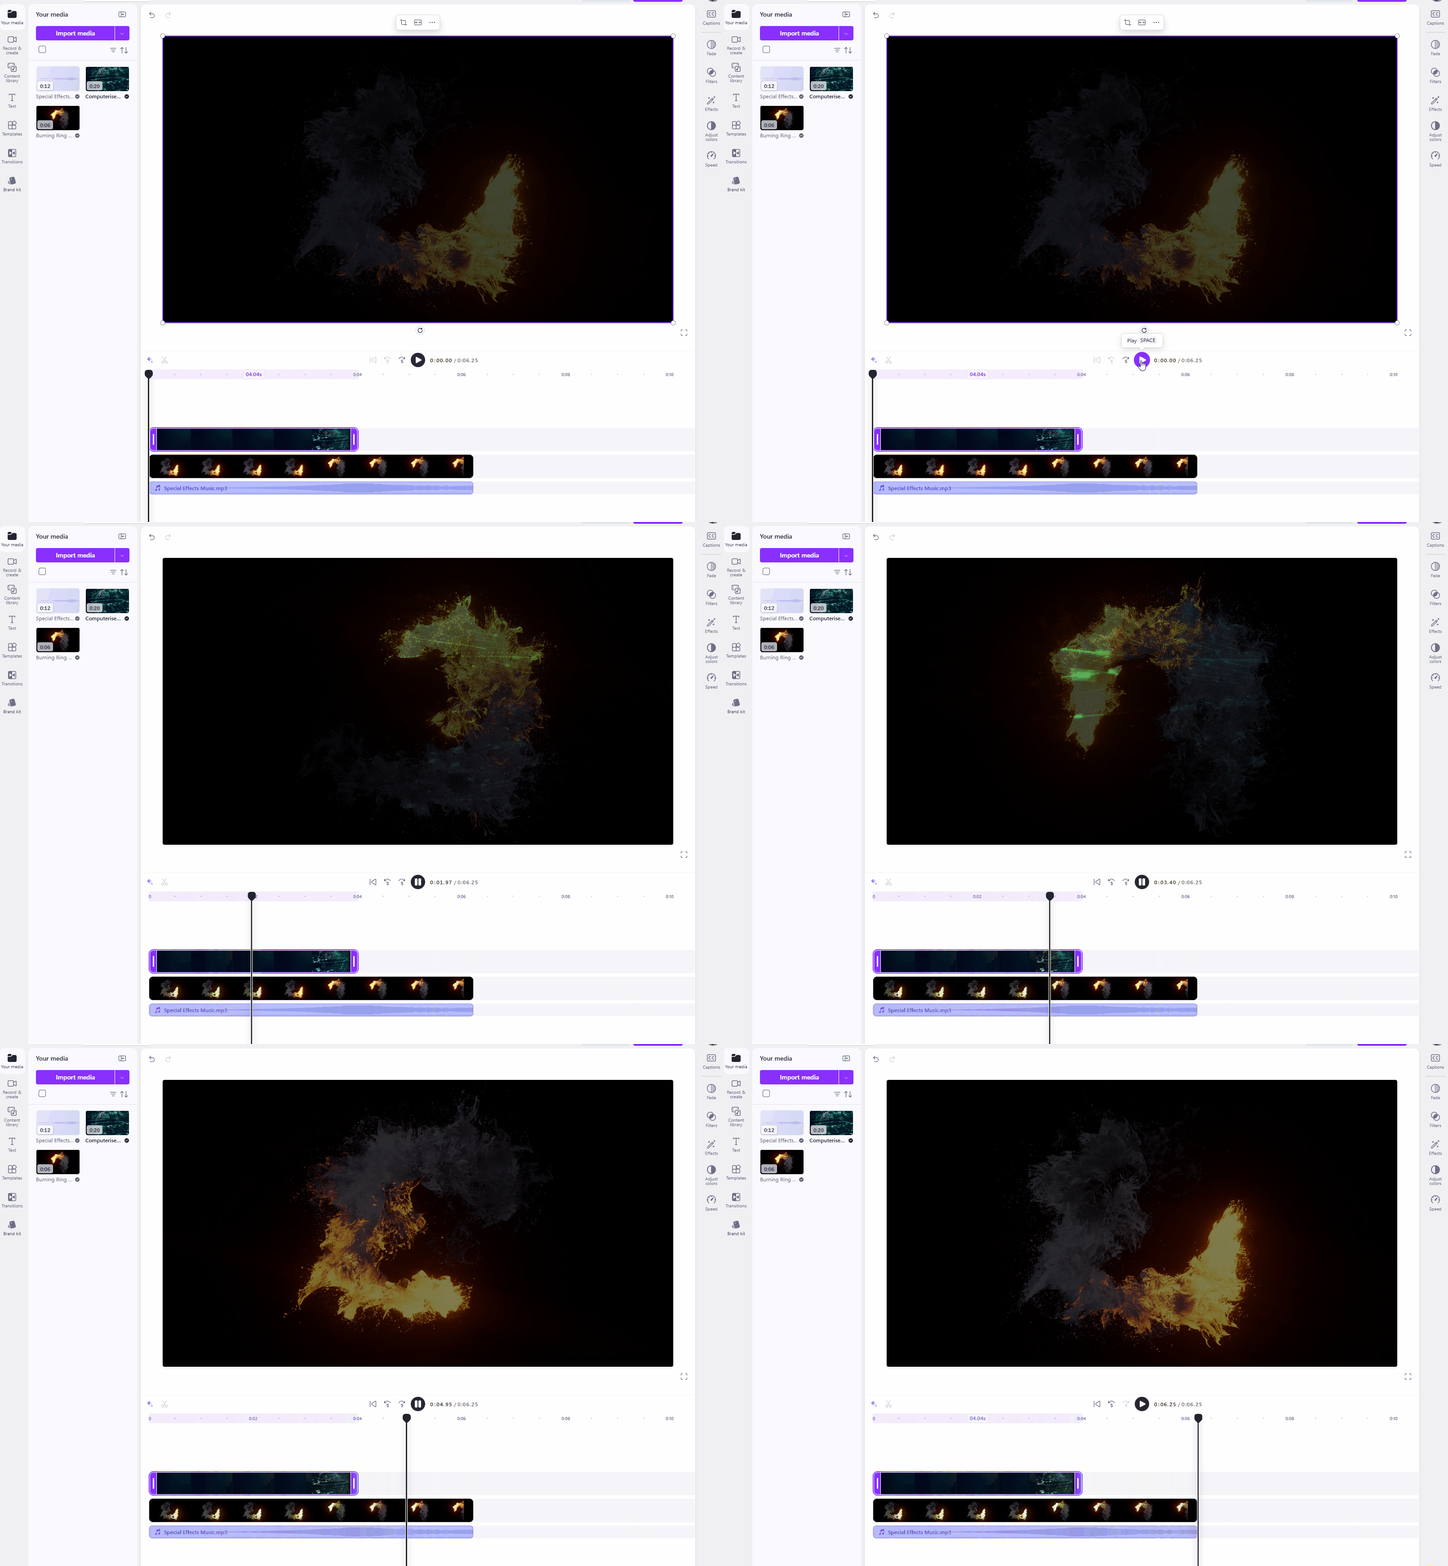
 This lesson will introduce you to professional techniques designed to enhance the quality and sophistication of your video productions. You will explore methods to create polished, engaging content similar to professional vlogs or short films, while developing creativity, technical precision, and collaborative skills.
In today's digital world, advanced video editing skills are essential for effective communication and storytelling. Whether you aspire to create content for social media, school projects, or future careers in media, mastering these techniques will enable you to produce videos that captivate audiences and convey messages clearly. This lesson emphasises hands-on practice to build confidence and proficiency.
By the conclusion of this lesson, you will be able to:
For this lesson, we will utilise Clipchamp, a free online video editing tool. If you have not yet accessed it, please visit Clipchamp to get started and to get your account set up. Prepare by gathering some video footage, such as clips recorded on your mobile device or royalty-free stock videos obtained through safe online searches. Examples of these websites are Pexels , Pixabay and Canva.
We will also need to get some audio files and these can be sourced from FreeSound, BBC Sounds and Pixabay Sounds.
In this step, you will learn how to work with multiple tracks in your video editing project using these specific clips. While basic editing often uses just one track, advanced videos need multiple video and audio tracks to layer things like overlays, effects, and sounds. This lets you build cool effects, such as overlaying a spinning globe on a fiery ring with matching music, just like in professional sci-fi videos or music clips.
Multiple tracks make your videos more exciting and professional. You can keep different parts separate, so it's easier to edit without messing up the whole project. For example, one track for the main video, another for an overlay, and a third for audio. This helps everything stay organised and look polished.
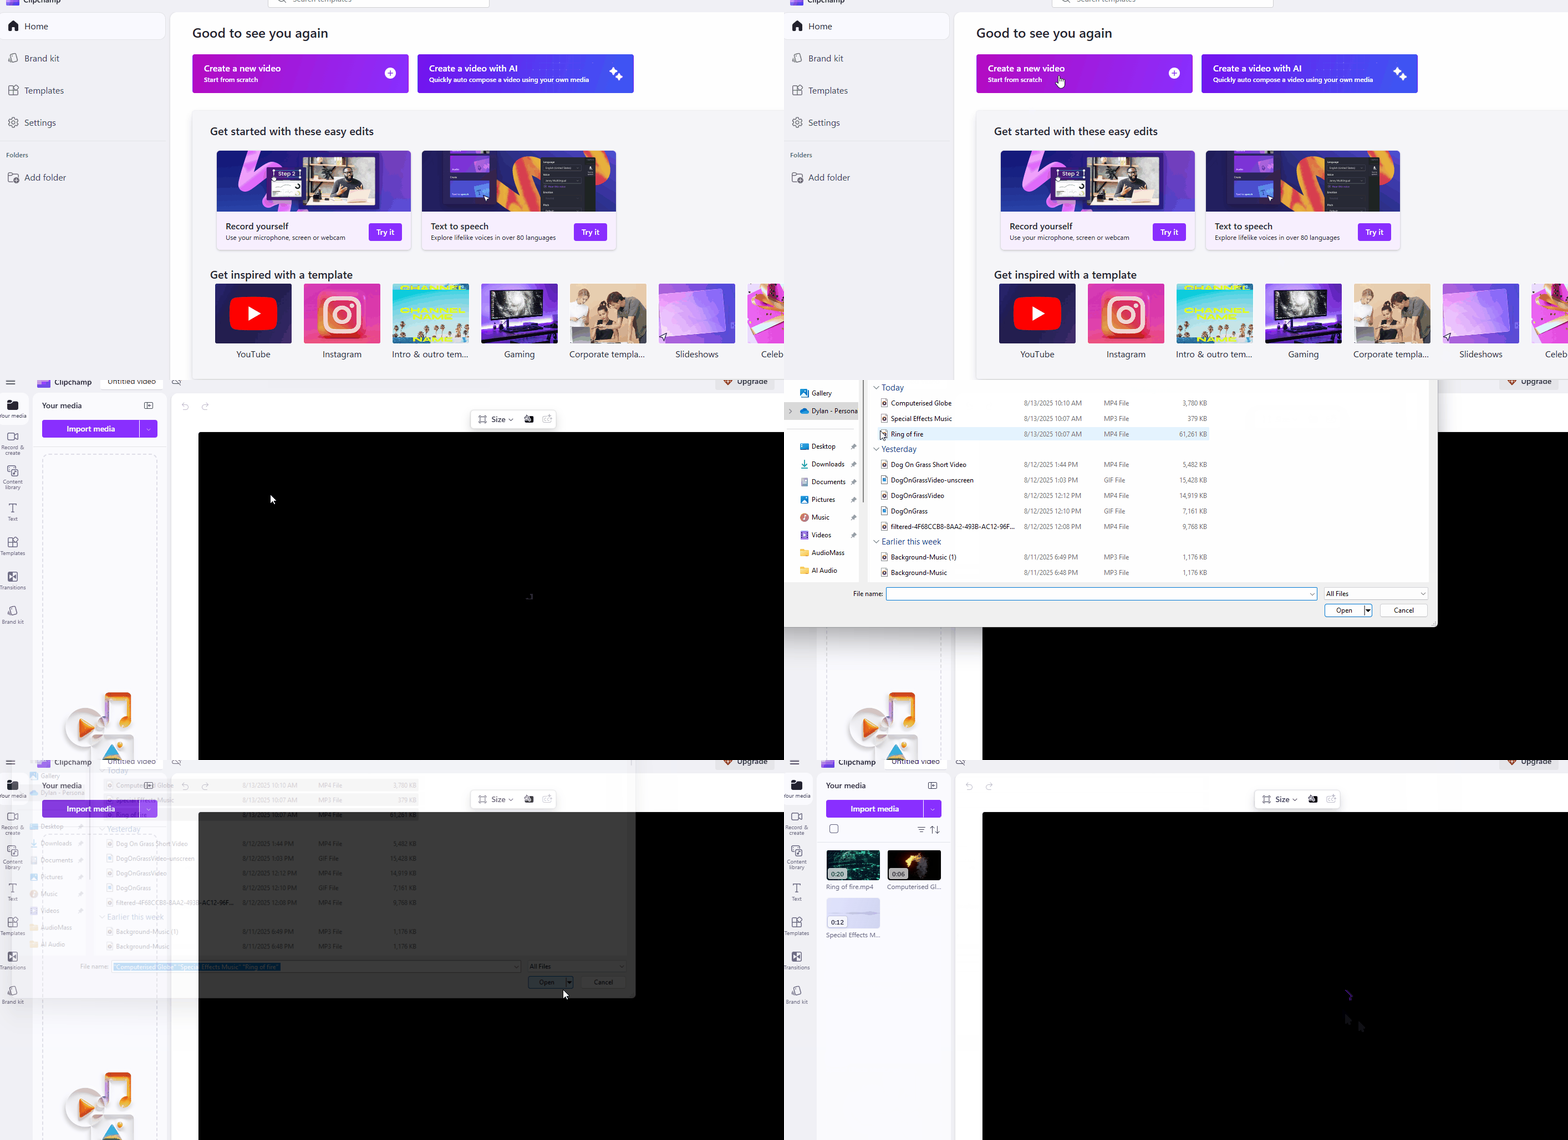
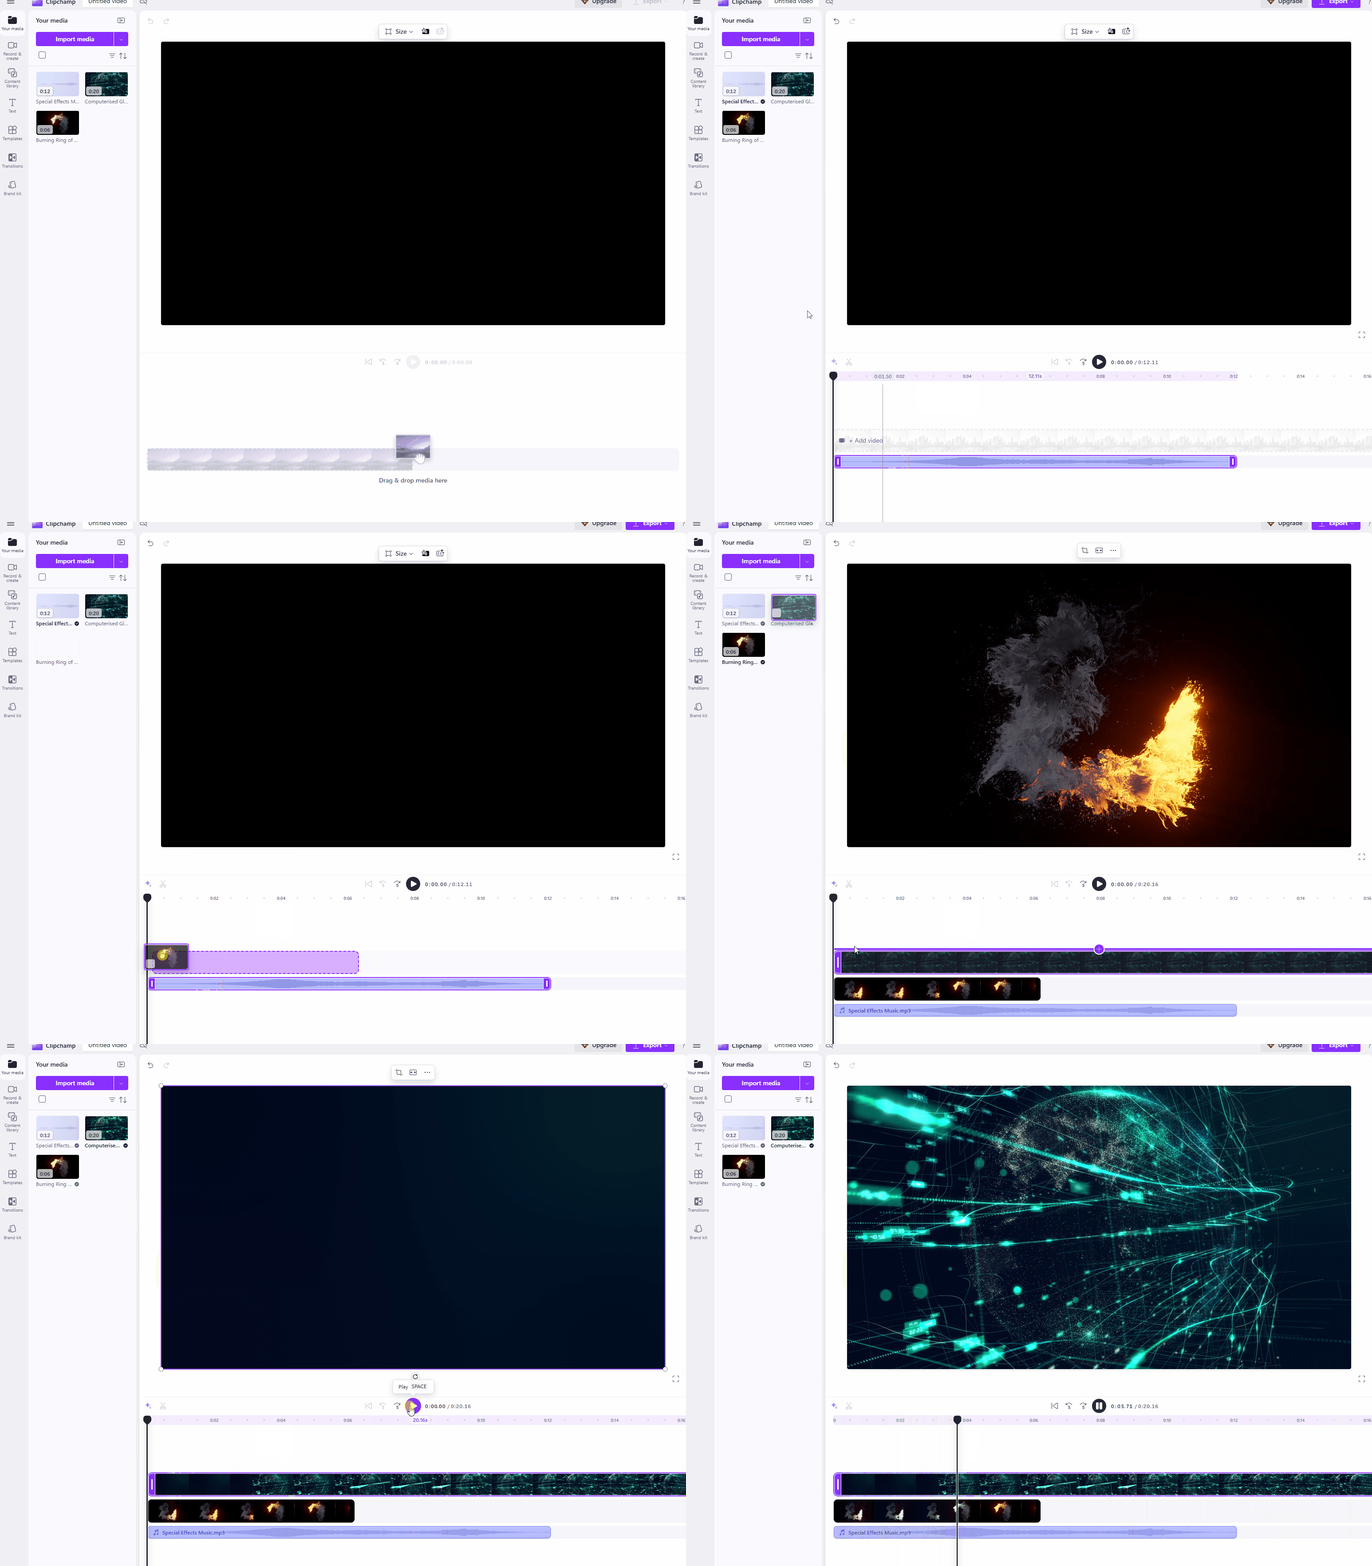
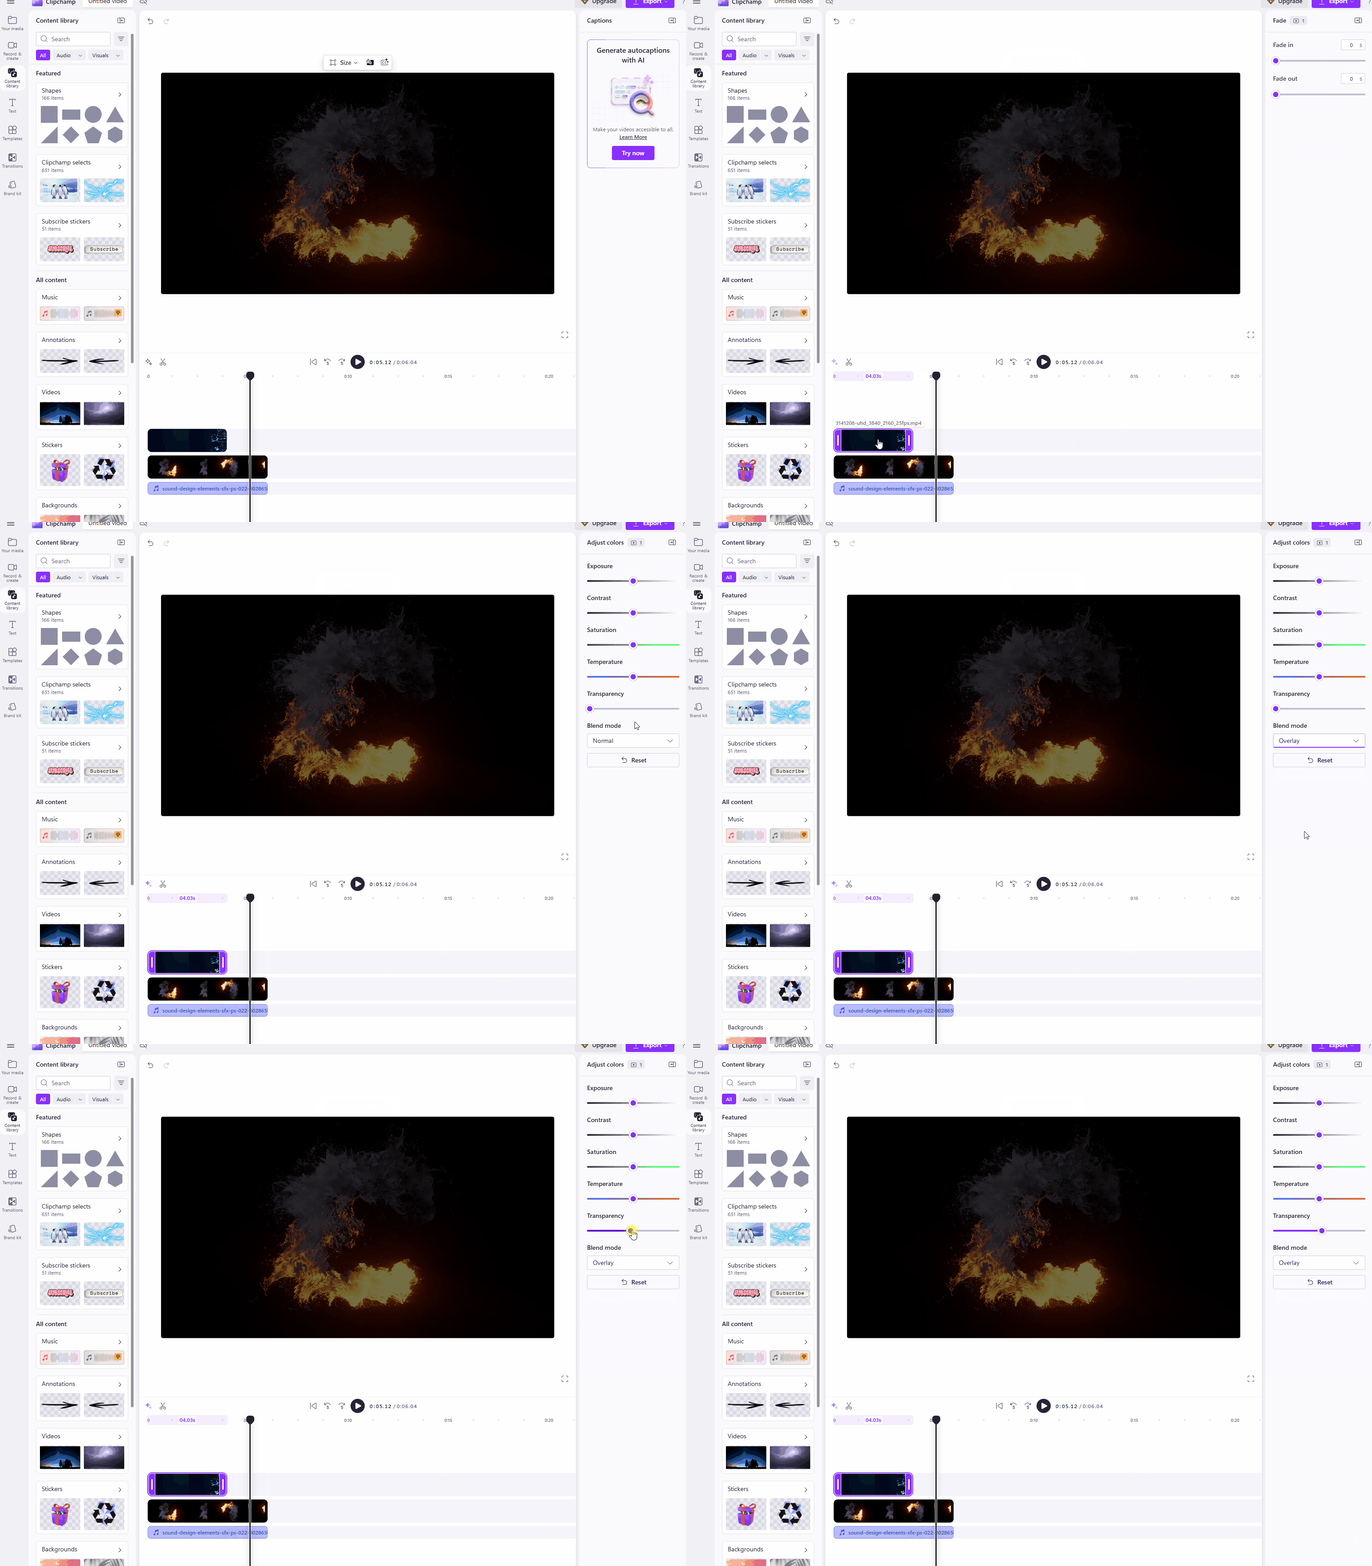
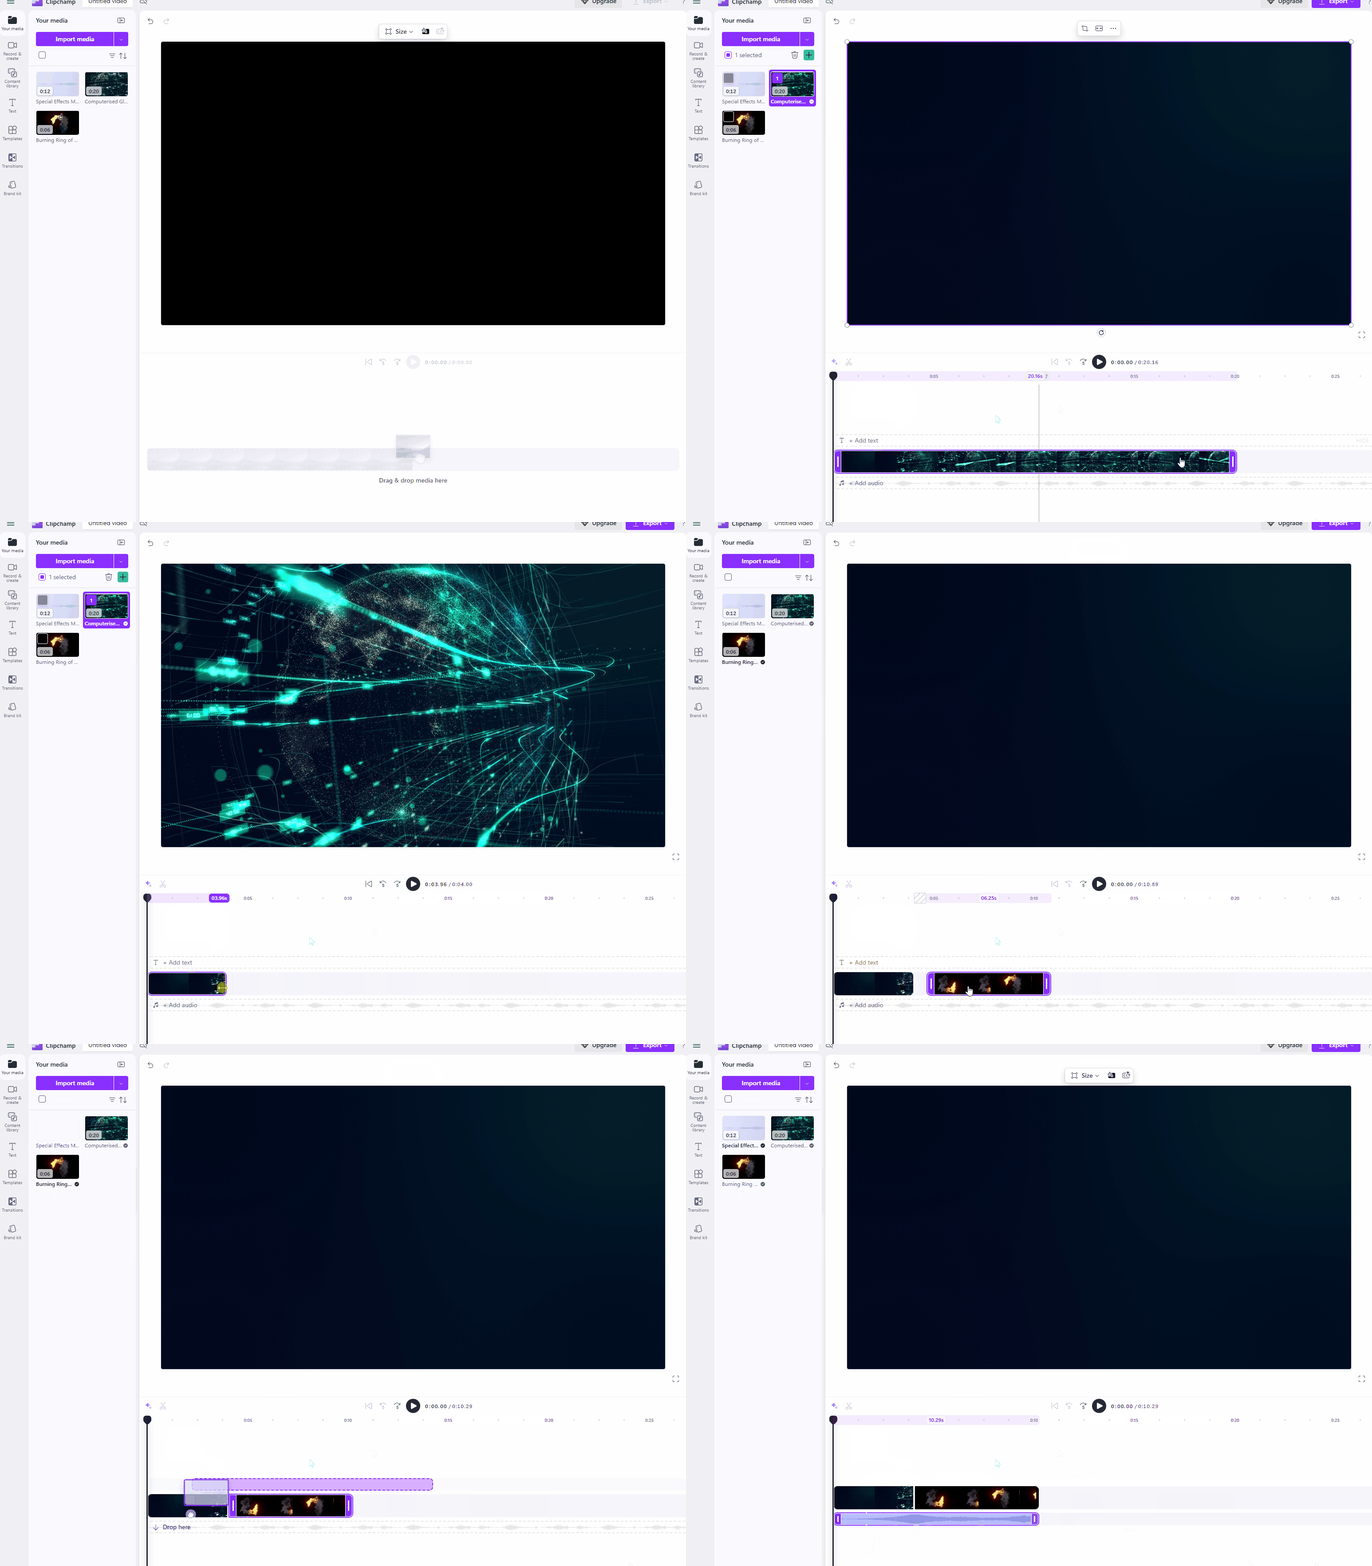
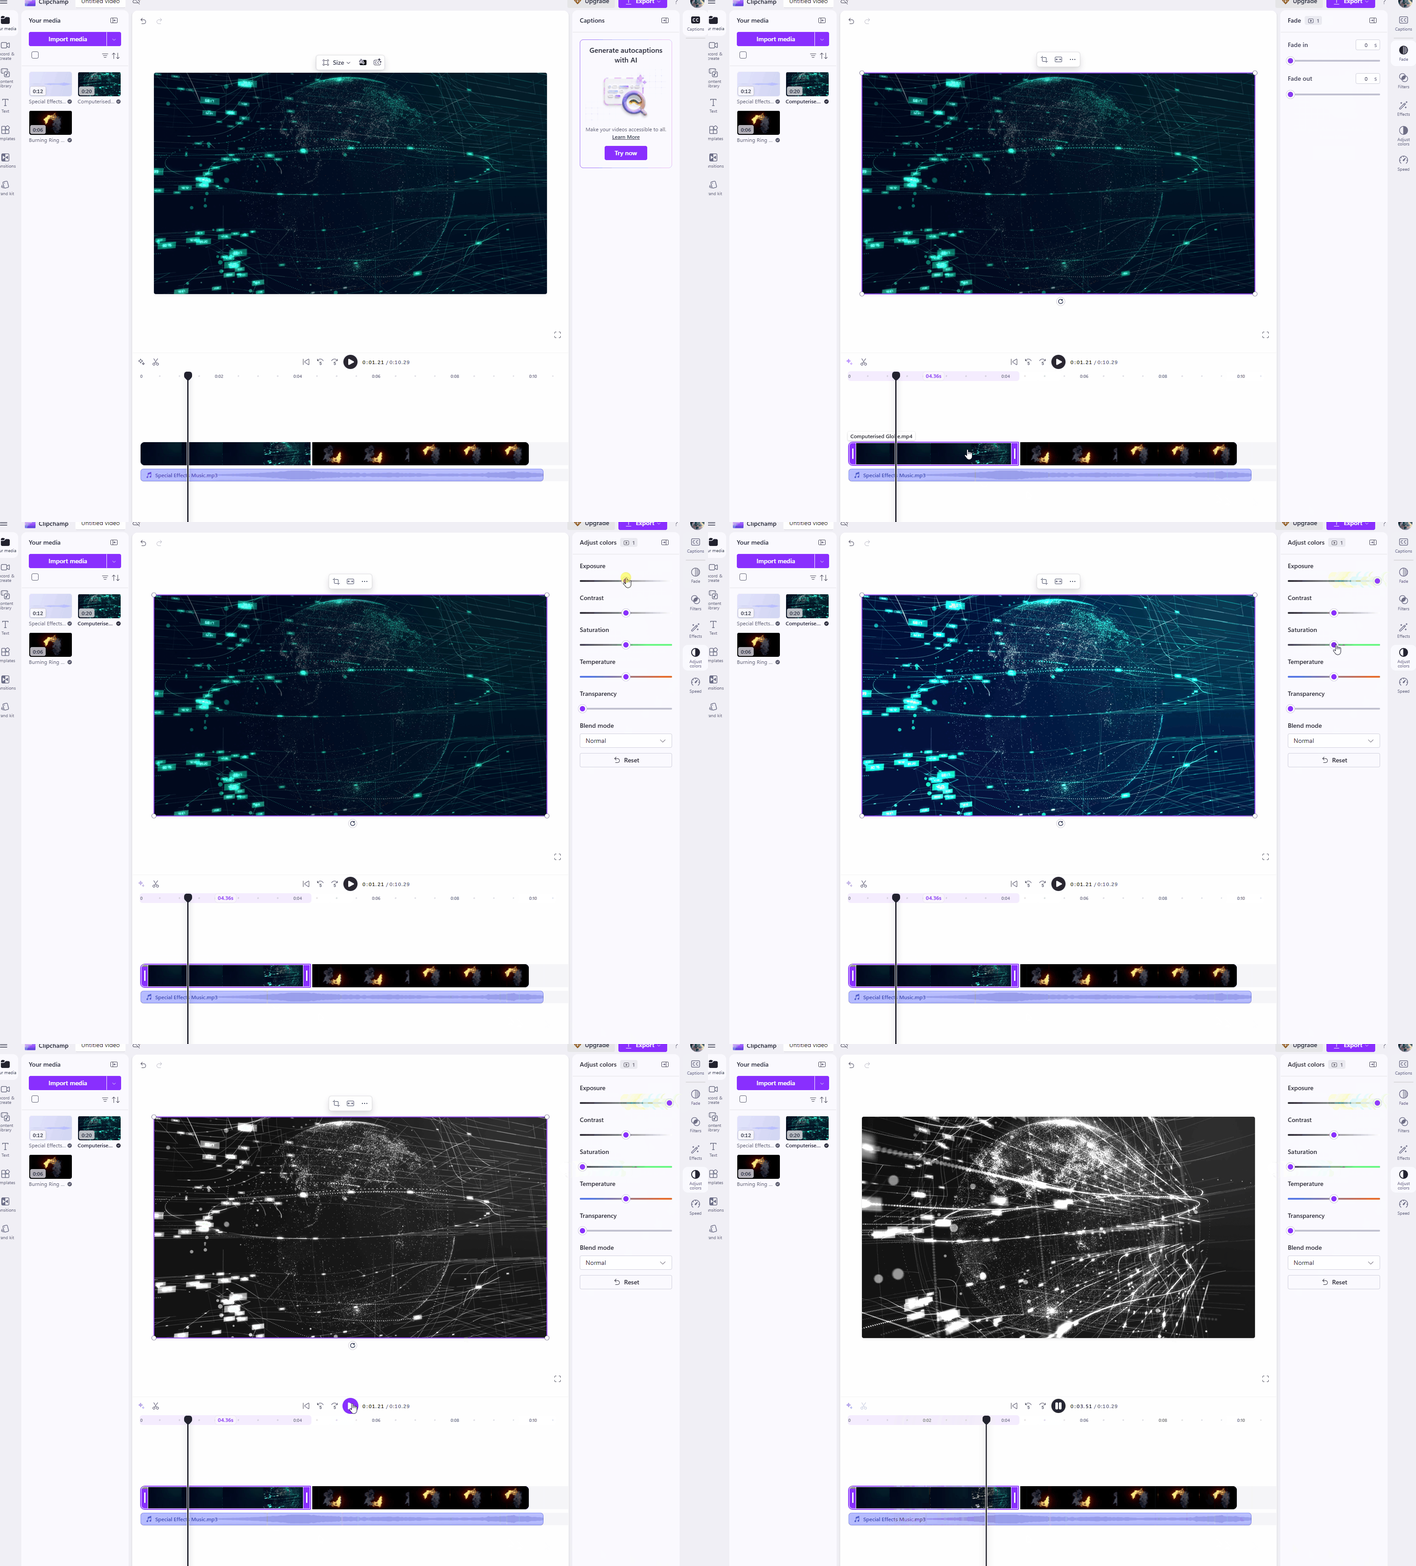
Open Clipchamp and select 'Create a new Video'. Import the provided video clips and audio file by clicking on 'Import Media' and selecting the media files that you have downloaded.Drag the Ring of Fire Video clip onto the timeline. This will be your base track. drag the Computerised Globe Video clip onto the timeline and place it above the ring of fire track. drag the 'Special Effects' audio clip onto the timeline and this will usually go below the video clips and into the audio section. Next we need to trim the ring of fire clip by dragging the edges of the clip and pulling it back to 6 seconds, we do the same for the audio clip (6 seconds) but we need to make the computerised globe clip 4 seconds. 'overlay', click on the Computerised Globe Video clip on the timeline and select 'Adjust Colours' on the panel on the right hand side. Here you will see the exposure, contrast, saturation, temperature and transparency of the video. We also see that the 'Blend Mode' is set to 'normal' and we need to click on this and change it to 'overlay'. move the transparency level to about half way which should give the video clip 50% transparency so the fire below is visible a wee bit through the globe. Since the globe clip ends at 4 seconds, the ring of fire will become fully visible for the remaining 2 seconds, just as the music continues playing. If needed, adjust the audio to fade in stronger around the 4-second mark for better timing. You can also experiment with the transparency to see each clip more clearly or less clearly. right-clicking them and choosing rename. This keeps things tidy.In this step, you will learn about advanced export settings in Clipchamp. These settings allow you to optimise your video for different platforms by selecting appropriate resolutions, formats, and quality levels. For instance, you might choose high resolution for YouTube to ensure clarity, or a compressed format for Instagram to reduce file size while maintaining good quality. Mastering these options ensures your videos look professional and perform well on various devices and sites.
Using the correct export settings is essential for sharing your videos effectively. Different platforms have specific requirements for file size, aspect ratio, and quality, and choosing the right options prevents issues such as poor playback or excessive loading times. This step builds on your editing skills by teaching you how to finalise and distribute your projects professionally, ensuring they reach your audience in the best possible form.
Once you have completed editing your video project, follow these steps to export it with advanced settings. You can use any short clip from your current project or a previous step for practice.
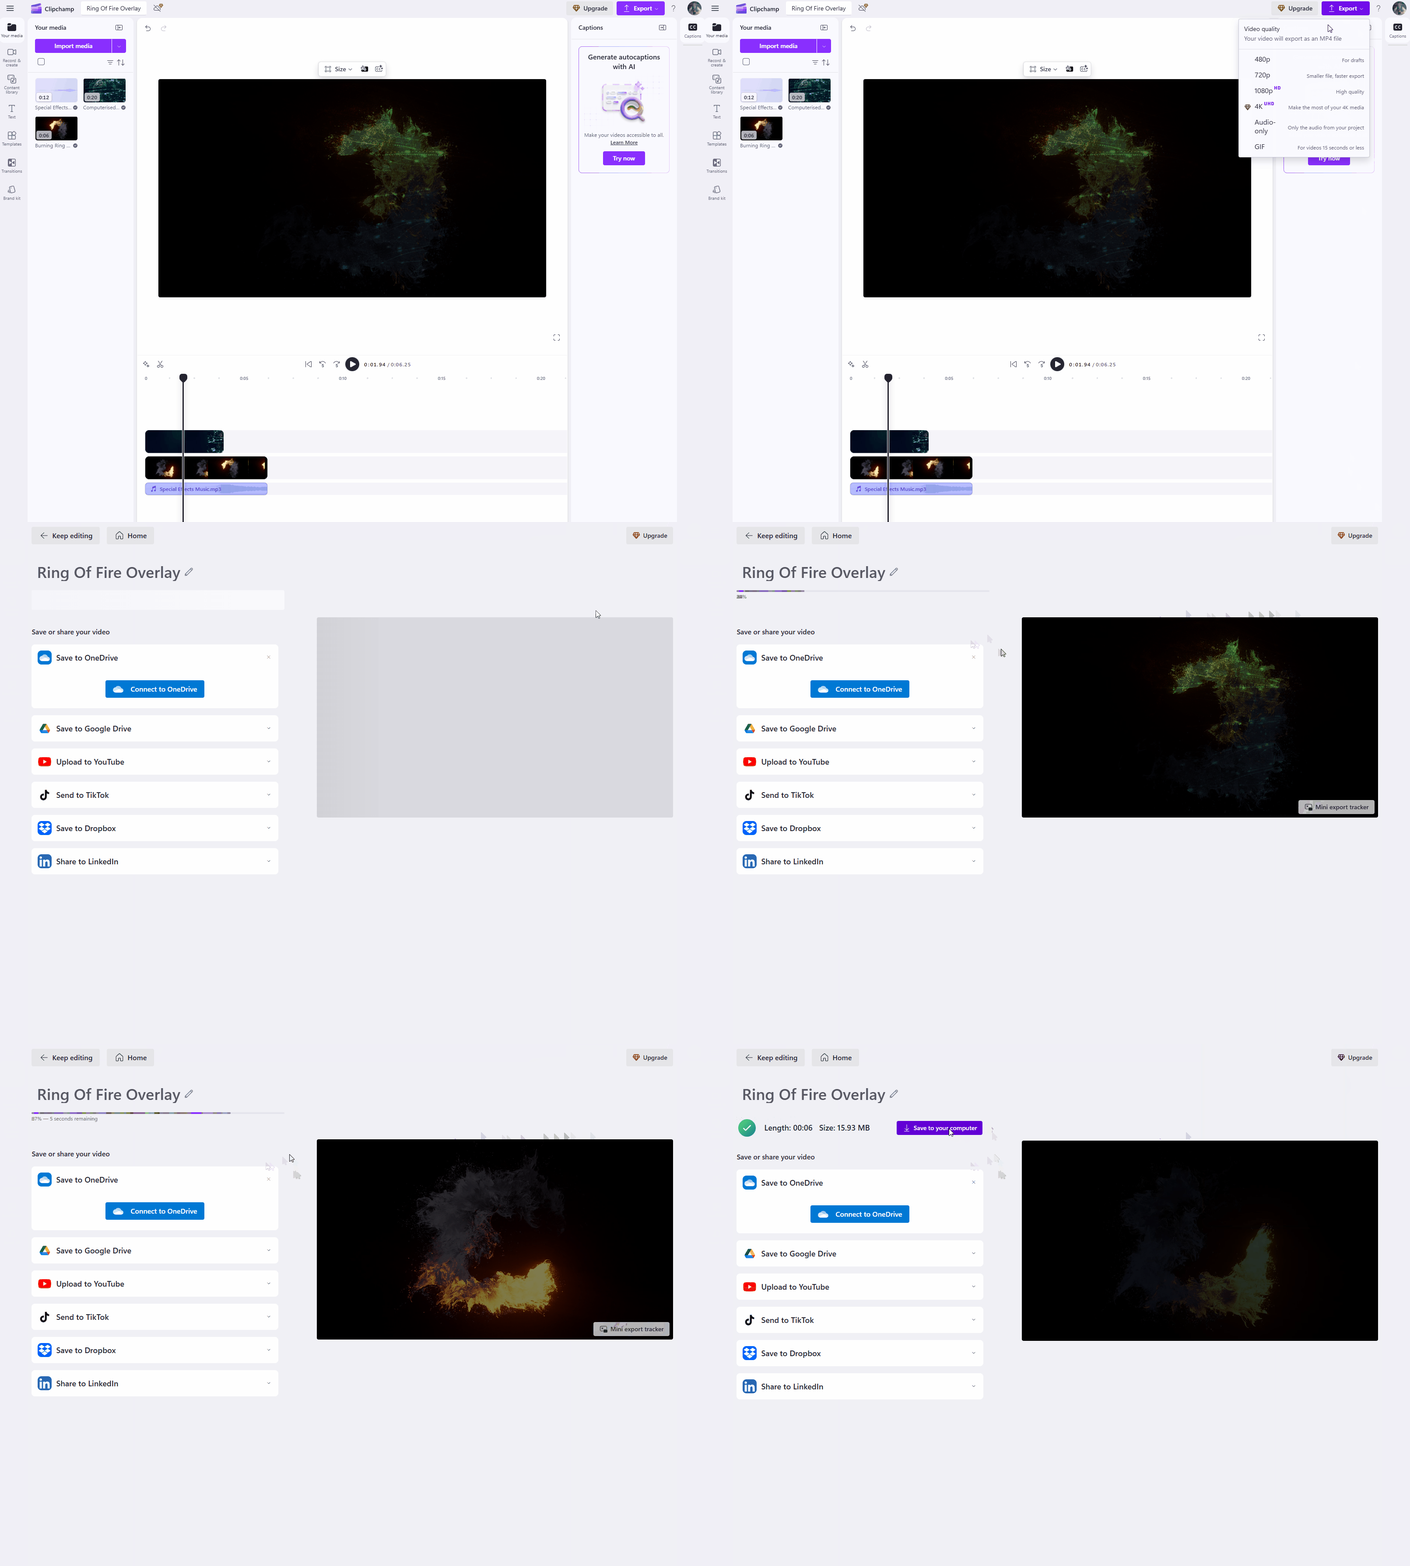
Click on the Export button located in the top-right corner of the Clipchamp interface. This will open the export menu.select your desired resolution from the options available, such as 720p for standard quality, 1080p for high definition, or 4K for ultra-high quality. click on the 1080p option the video will start downloading automatically to your computer. click the 'Keep editing' button in the top left hand corner in the screen to go back to where we were. view the downloaded file on your computer and to make sure it is of high quality. In this step, you will explore advanced transitions and effects to elevate your video editing beyond simple cuts and fades. These techniques, such as glitch effects, particle bursts, slow-motion, or distortions, can add a dynamic and professional touch to your projects. Consider how action films use dramatic scene changes to build excitement and maintain viewer interest.
Advanced transitions help to smoothly connect different parts of your video, while effects can enhance the visual appeal and emphasise key moments. By mastering these, you can create more engaging content that stands out, similar to professional videos on social media or in films. This builds on your skills in managing multiple tracks, allowing for more creative storytelling.
Continue working with the project from the step 2, using the Ring of Fire video, Computerised Globe overlay, and Special Effects audio. If you need to start fresh, import these clips again as before.
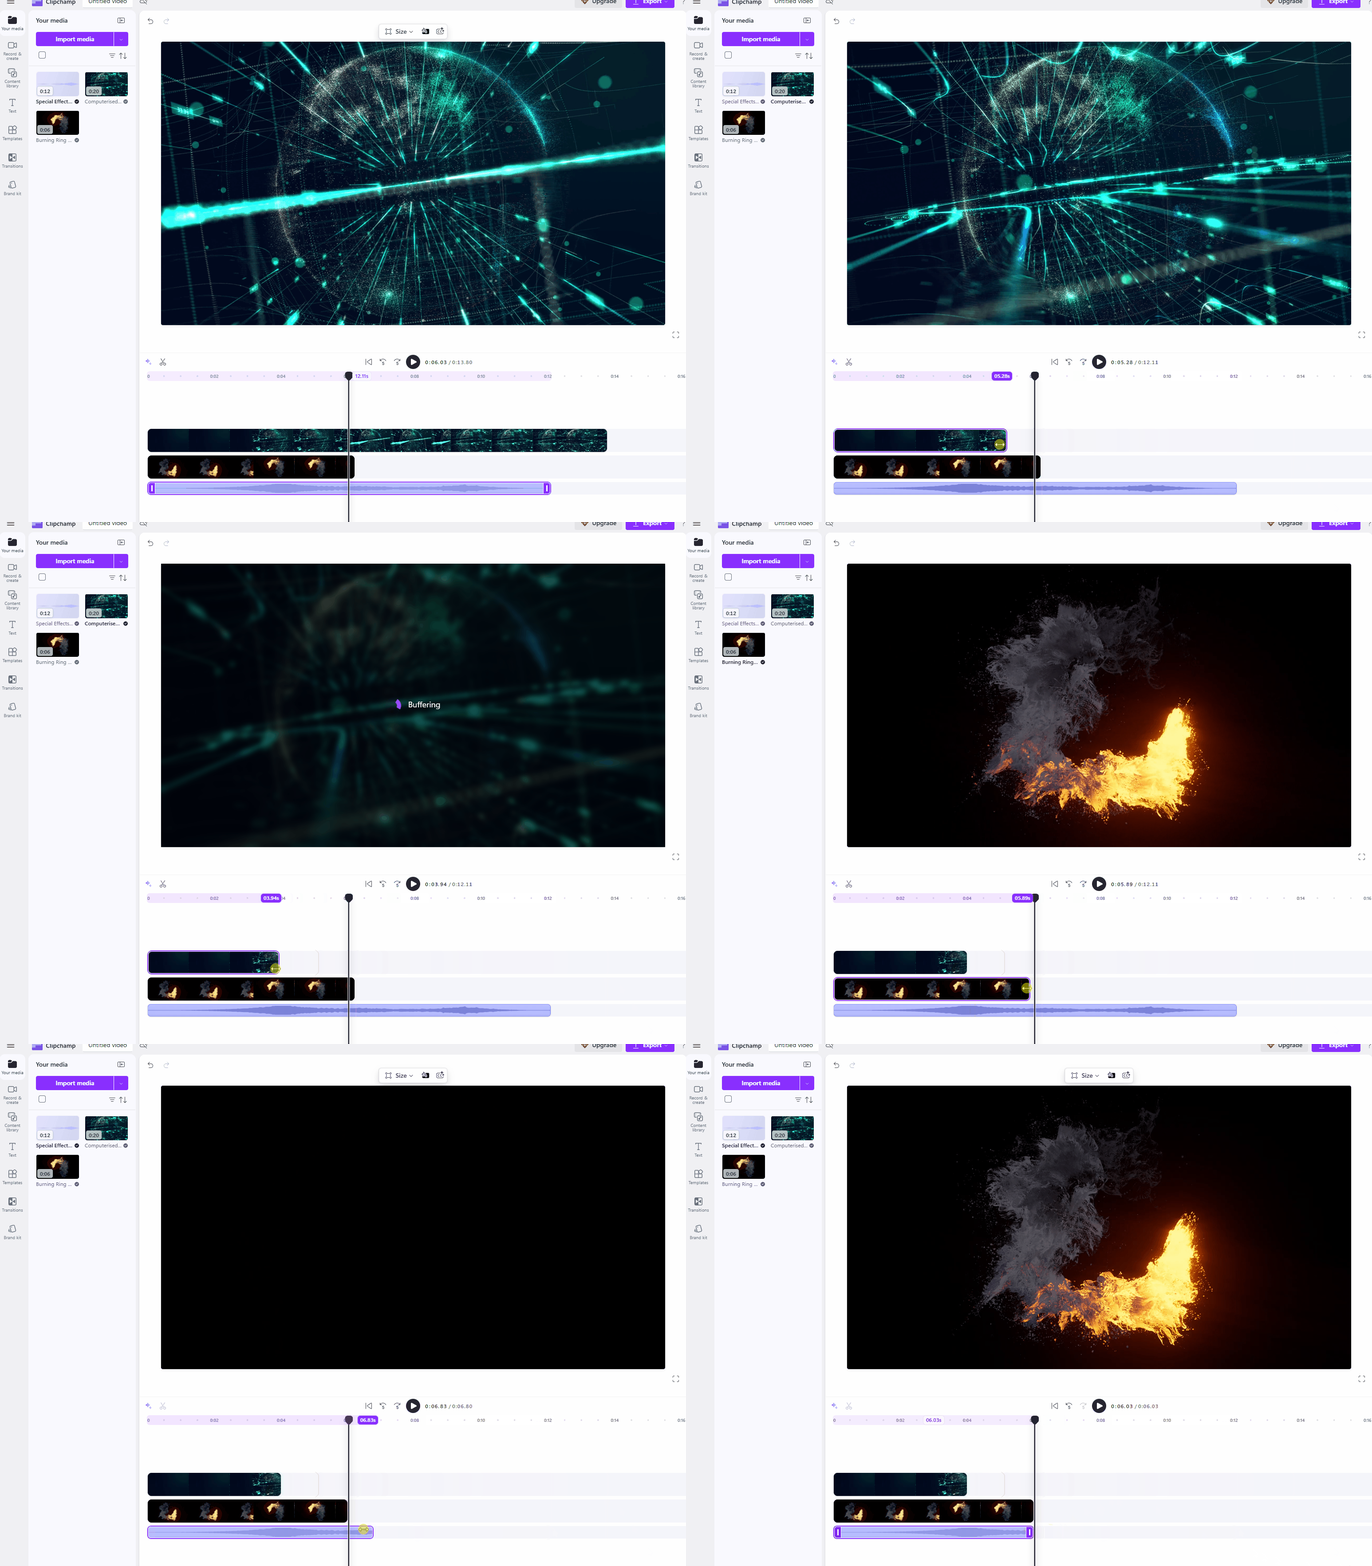
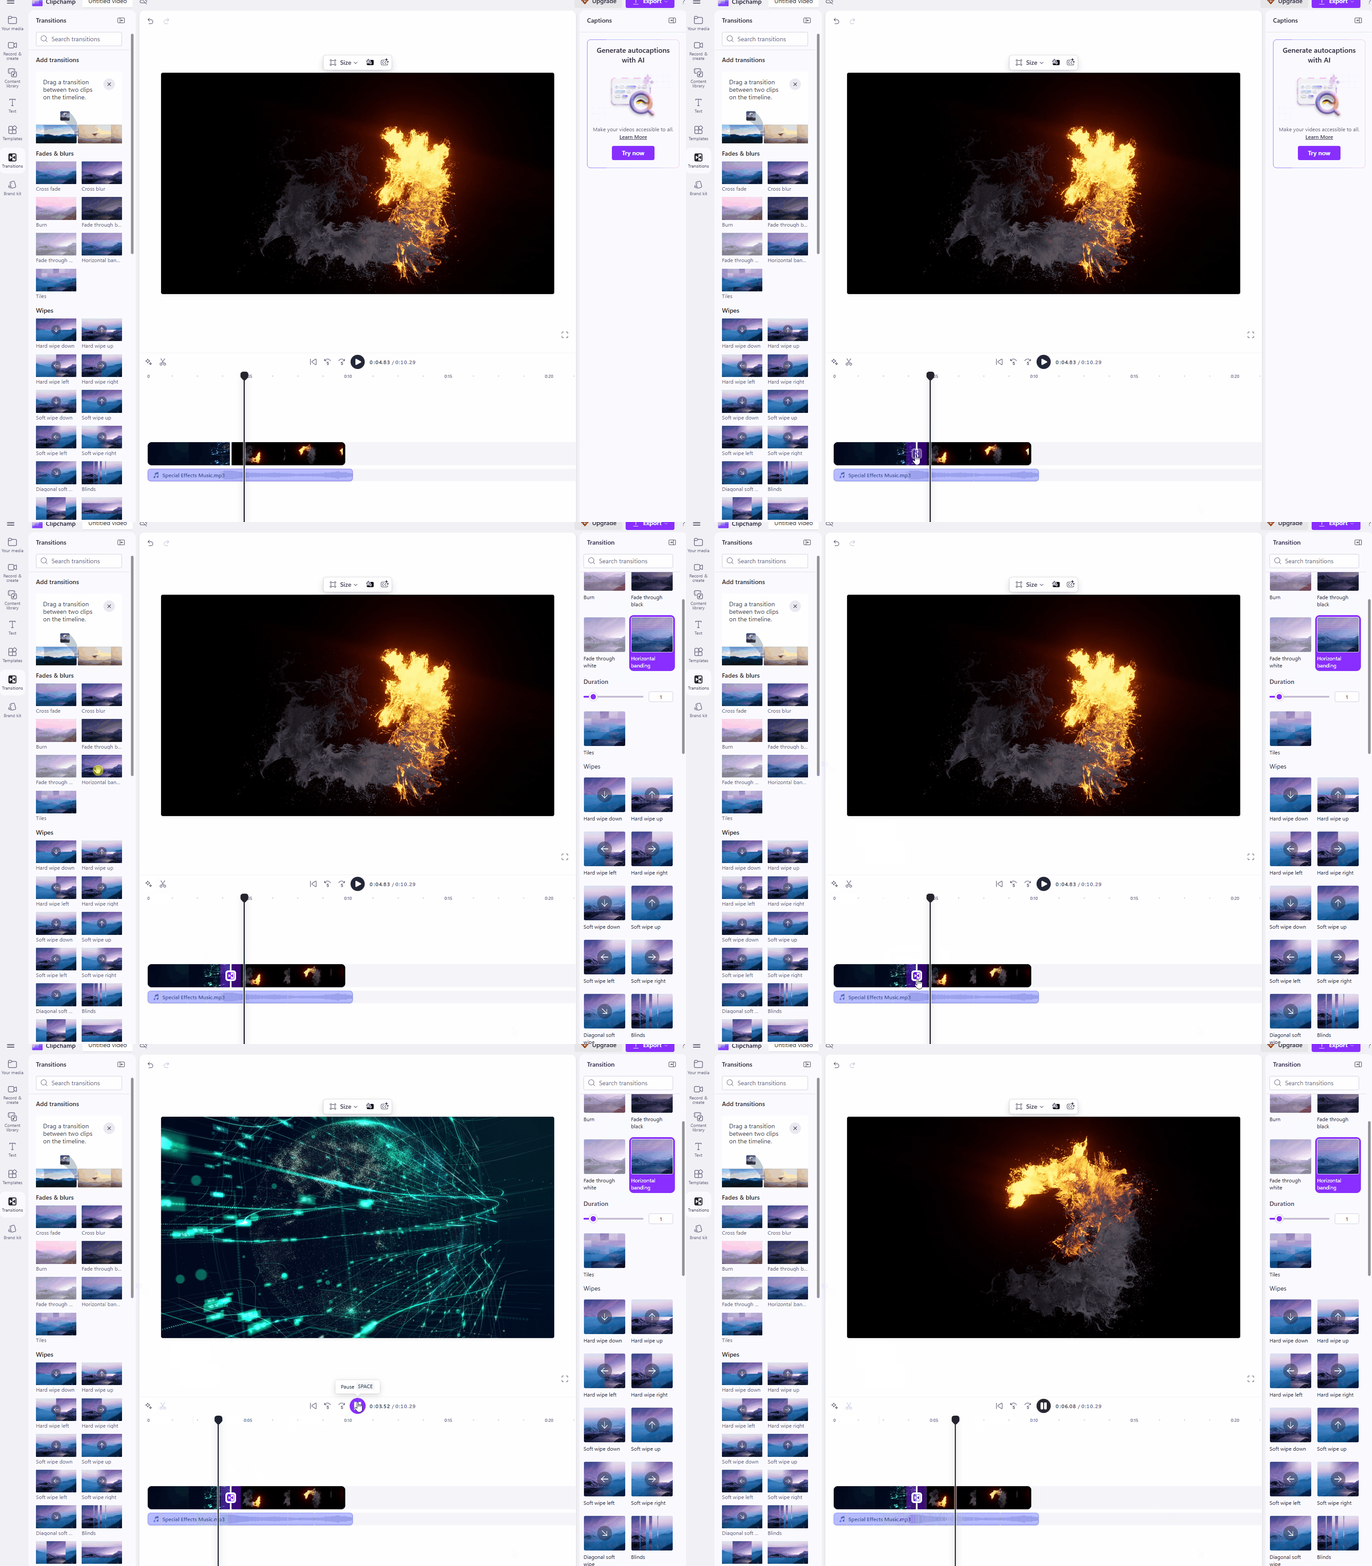
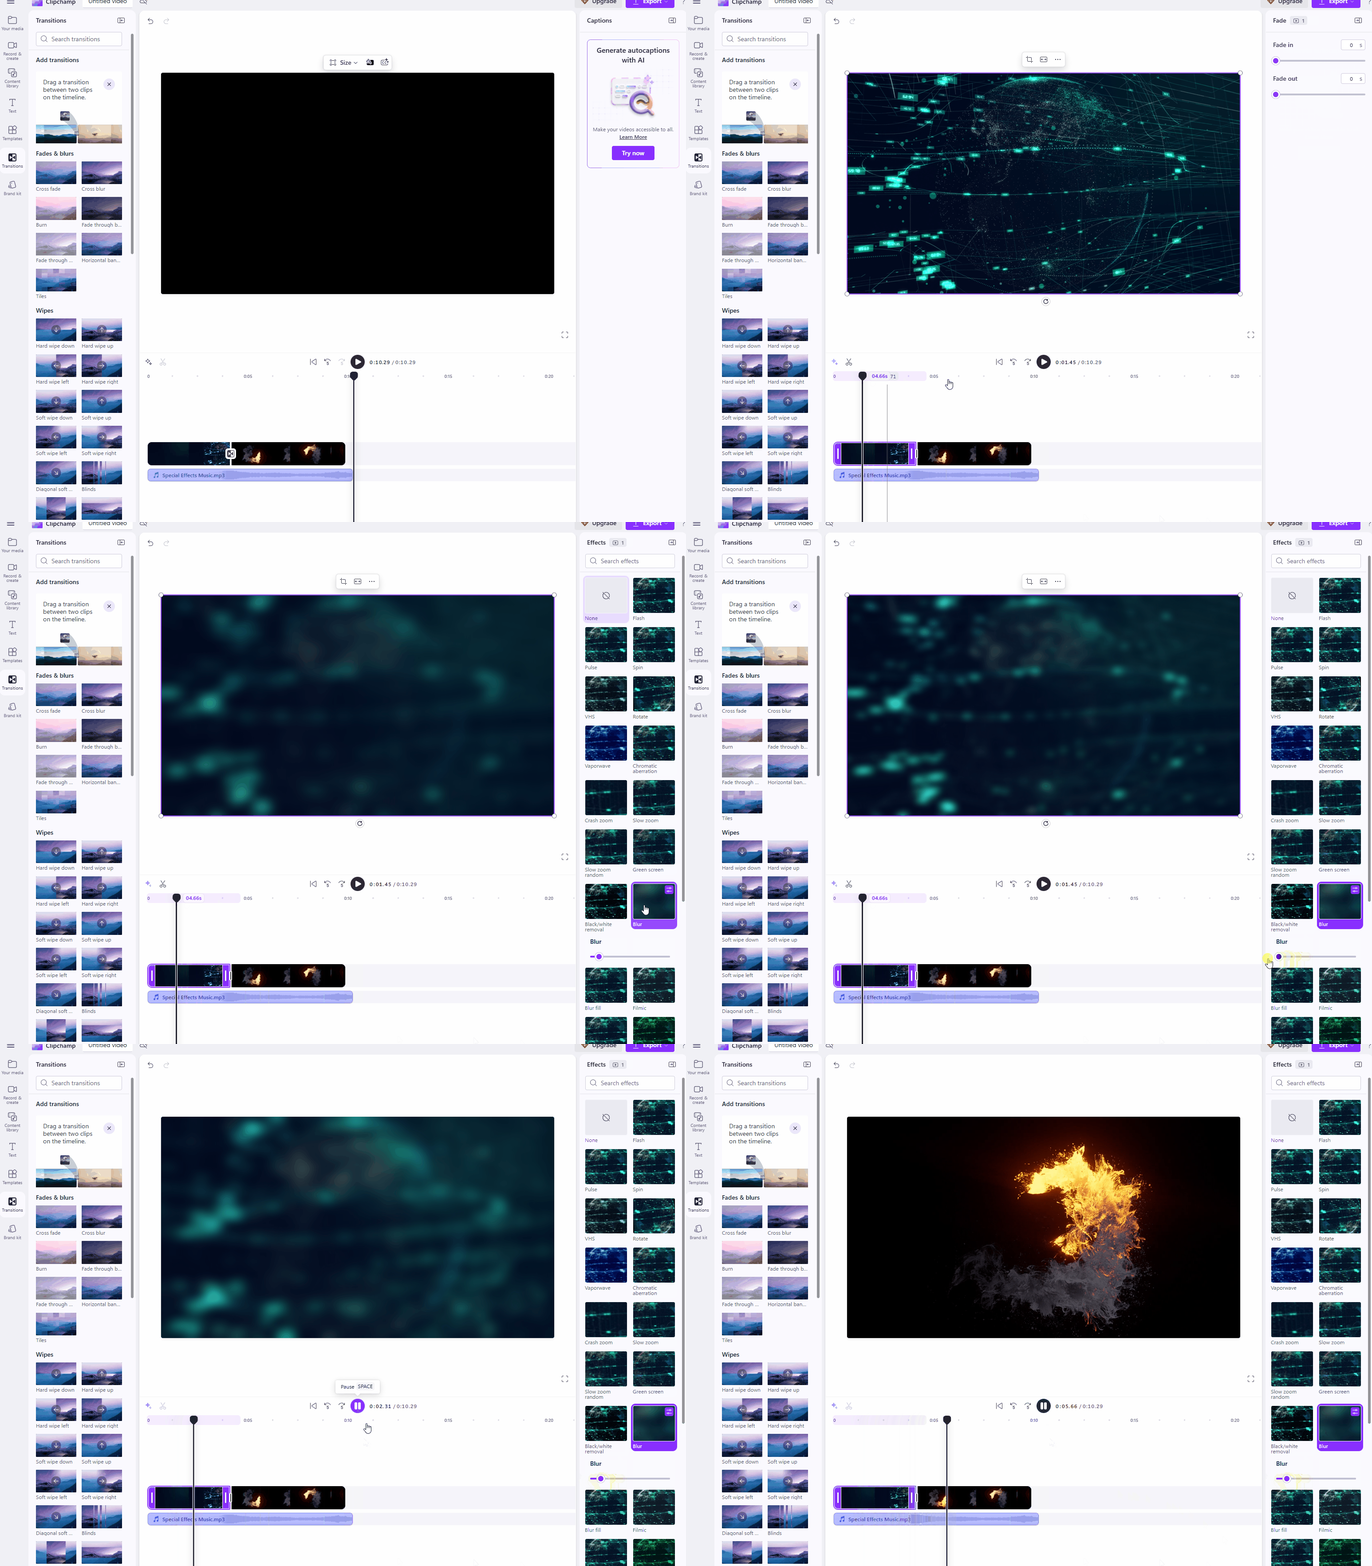
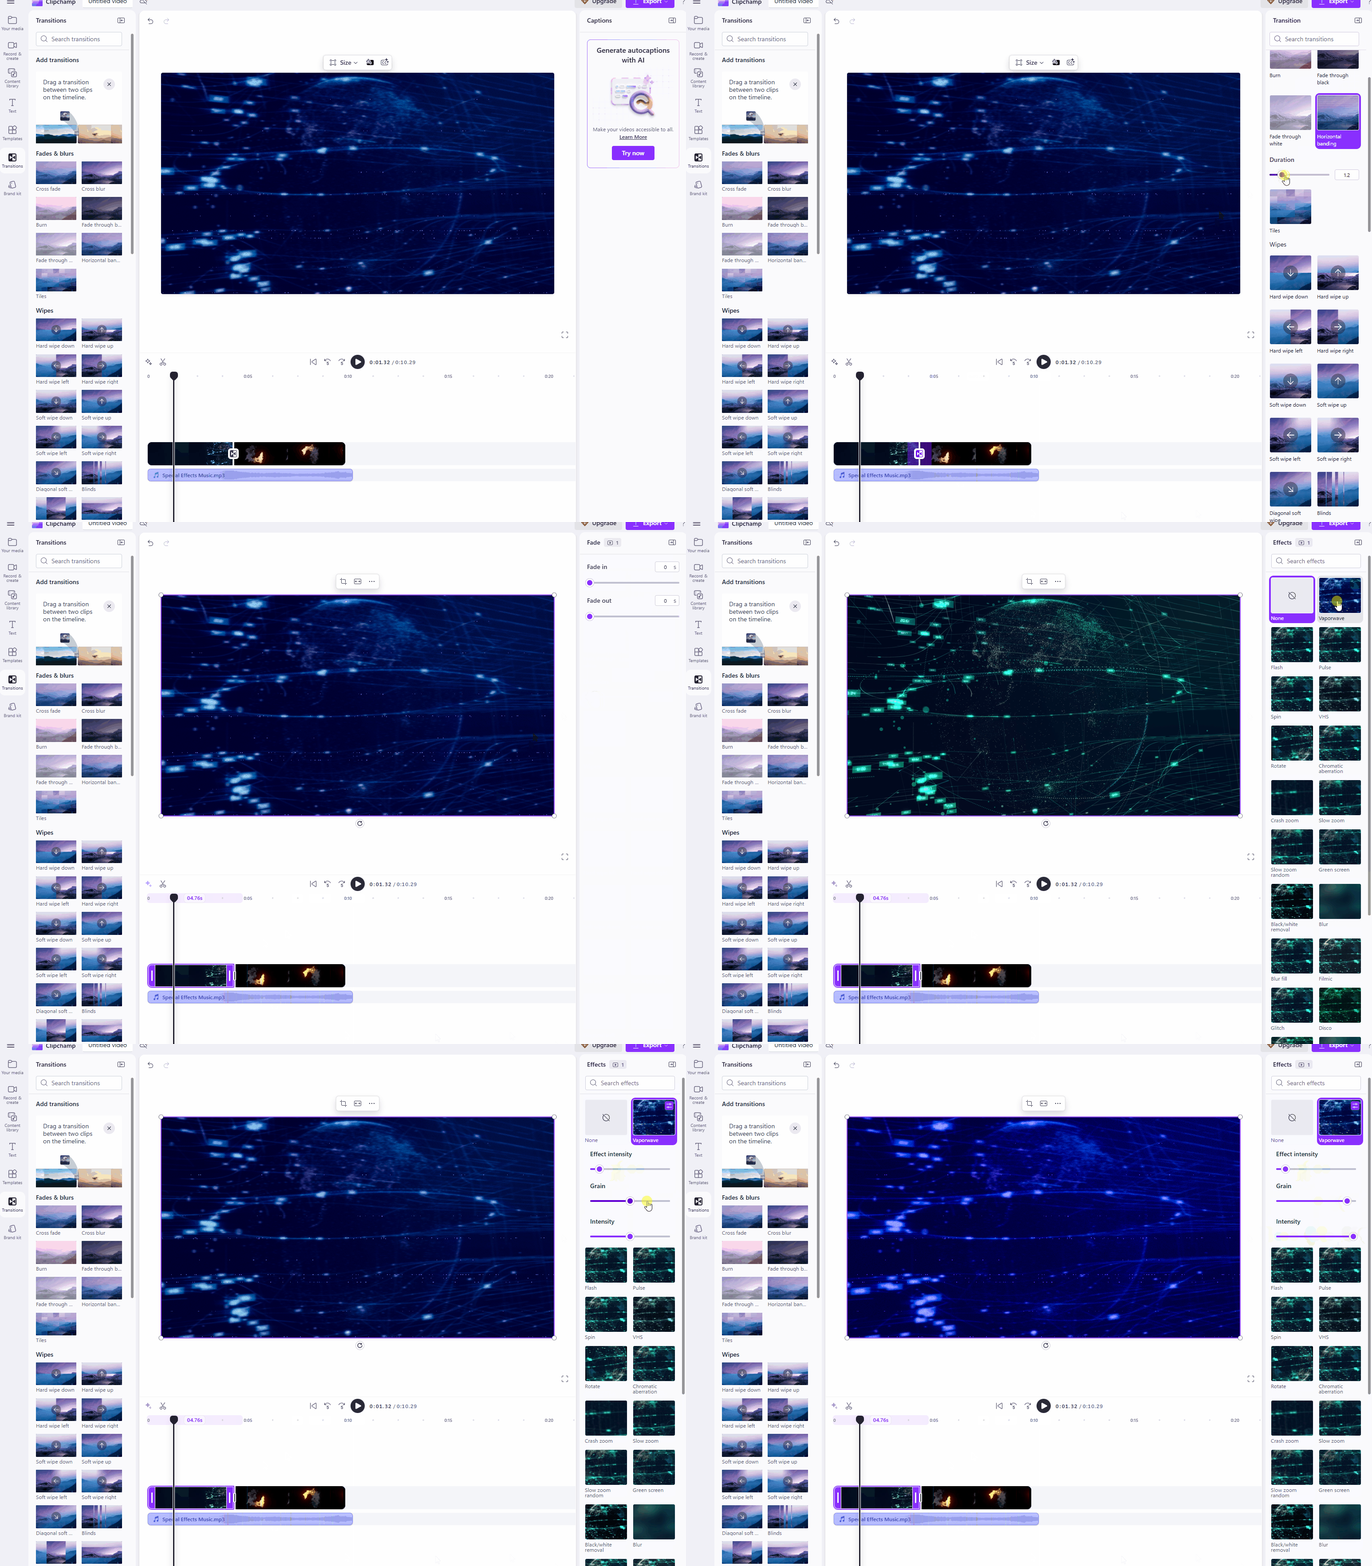
readd the media clips. We start by adding the Computerised Globe clip into the main timeline and trimming this down to 4 seconds. add the 'ring of fire' clip directly after the first clip and this doesn't need to be trimmed down. add is the audio clip and this goes directly below the videos in the audio section, we also need to trim this down to match the length of the videos. Select the junction between two clips on the timeline, such as where the Computerised Globe overlay ends and the Ring of Fire continues and click on the purple '+' button that says 'Add Transition'.Navigate to the 'Transitions' tab on the left-hand side panel and browse the available options. Choose a transition, such as 'Horizontal Banding' or 'Tiles', and drag it onto the junction between the clips.select a clip on the timeline, such as the Computerised Globe, then go to the 'Effects' tab in the right-hand panel. Apply an effect like 'Blur' or 'Disco' by clicking on it.Customise the transition or effect by adjusting its duration, intensity, or other properties in the panel that appears. For example, shorten the transition to 1 second for a quicker change, this is done by clicking on the transition between the 2 clips and going to the panel on the right hand side and by adjusting the duration. You can also adjust the effects by moving the purple bar up or down on the panel on the in the right hand side. . Preview the changes by playing back the timeline to ensure the transition and effect enhance the flow without overwhelming the content.Export the file if you are happy with how it looks before moving onto the next step. In this step, you will learn about colour correction and grading, which are essential techniques for enhancing the visual quality of your videos. Colour correction involves adjusting elements such as brightness and contrast to fix any issues in the footage, ensuring it looks natural and balanced. Colour grading, on the other hand, allows you to creatively alter the colours to set a specific mood or style, for example, using warm tones for cheerful scenes or cool tones for dramatic effects, much like in professional films.
These techniques are crucial because they can transform ordinary footage into something visually striking and professional. Proper colour work ensures consistency across your video, helps convey emotions effectively, and keeps viewers engaged. Building on the previous steps, you will apply these adjustments to the clips in your ongoing project to achieve a more polished appearance.
Continue with your project from the previous step, which includes the Computerised Globe clip, Ring of Fire clip, and Special Effects audio. If needed, import them again as described earlier.
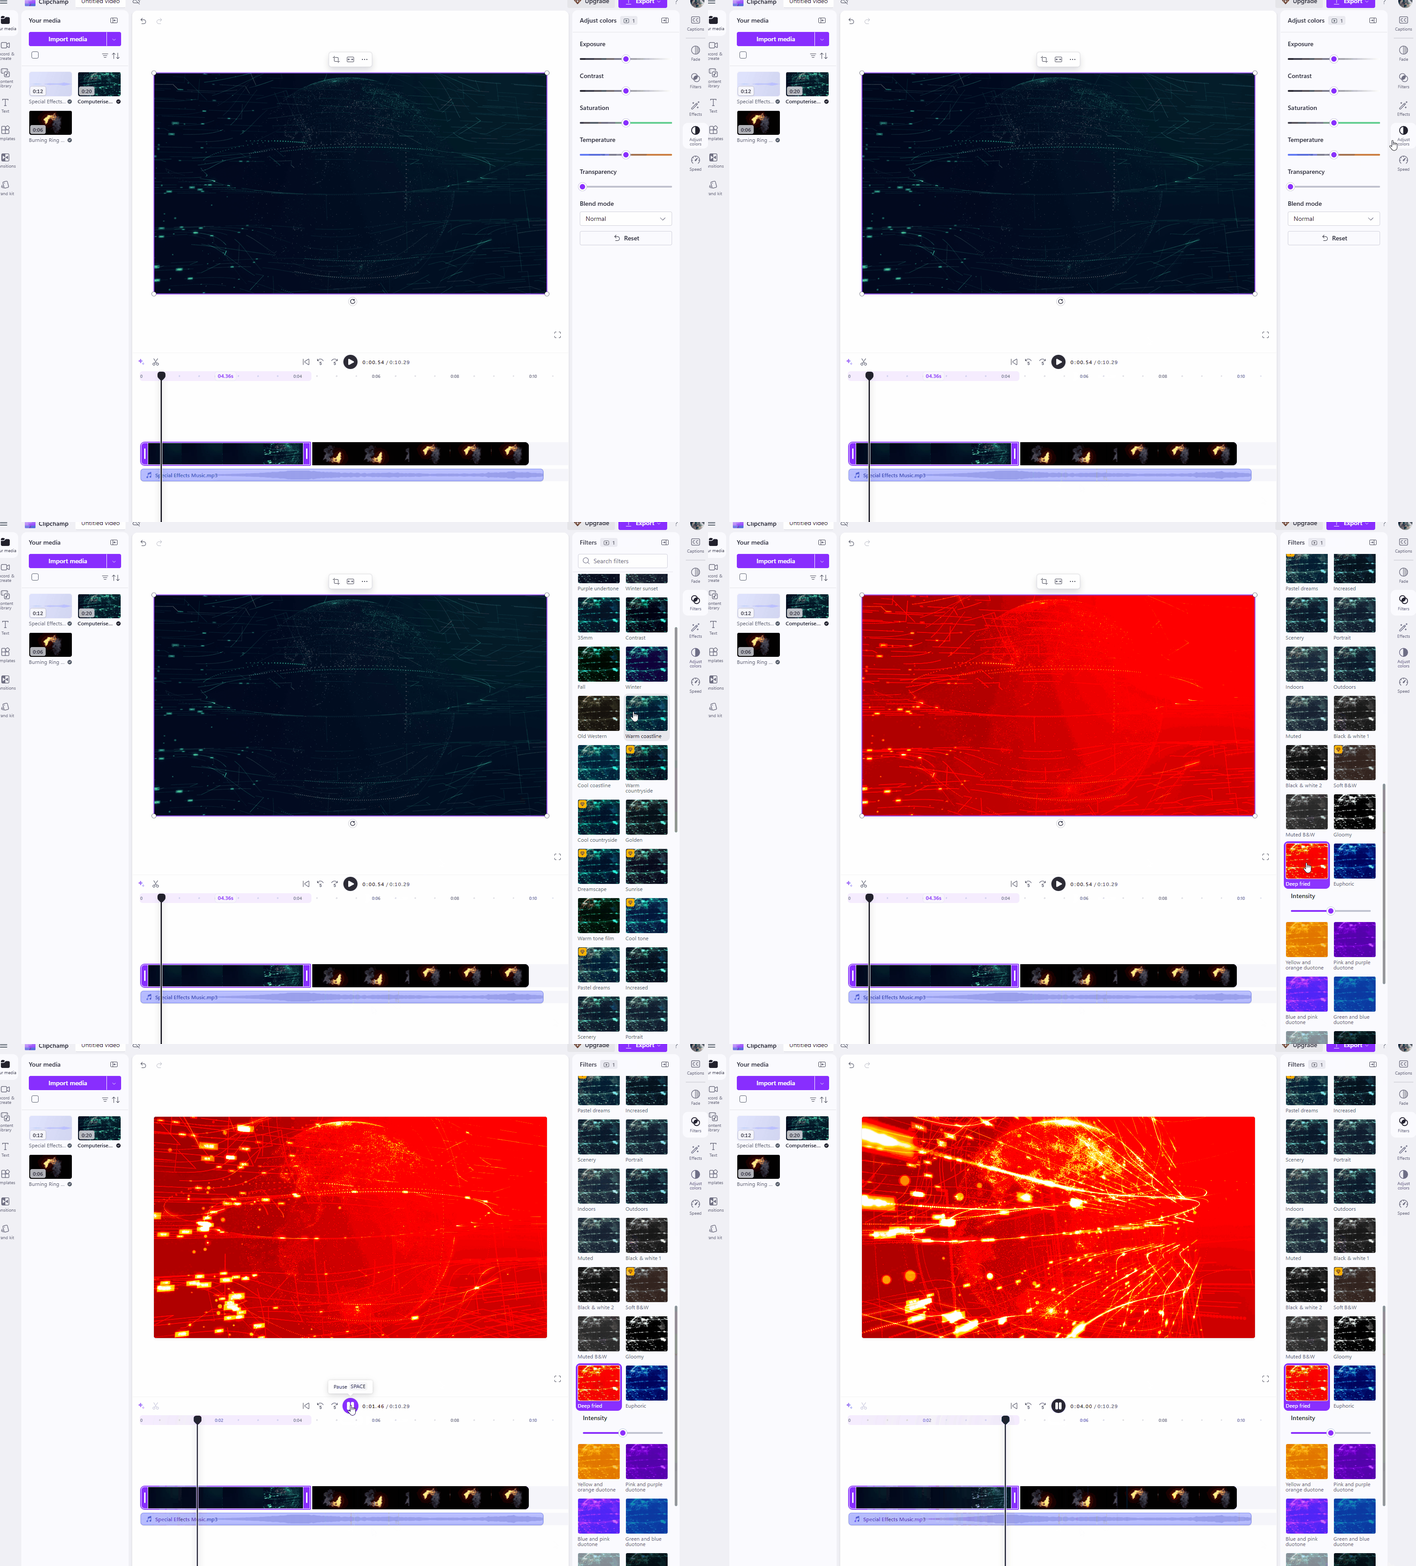
Select a clip on the timeline, such as the Computerised Globe, by clicking on it.Navigate to the 'Adjust Colours' tab in the right-hand panel. Use the sliders to make adjustments: increase exposure if the clip is too dark, boost contrast for better definition, and adjust saturation to make colours more vibrant without overdoing it. For temperature, slide towards warmer (orange) for a sunny feel or cooler (blue) for a mysterious tone.explore any available filters in the 'filters' panel – these are pre-set colour styles that you can apply with a click and then fine-tune. For this example I used the 'Deep Fried' filter but feel free to experiment with any filter you want. Preview your changes by playing the timeline and repeat the process for the Ring of Fire clip until you are happy with how your video clip looks.Export the file if you are happy with how it looks before moving onto the next step. 